Sunday, October 27, 2013

No Such Thing as a Day Hike; Personal Emergency Preparedness for Trail Hikers


Overview:

Incidents involving lost and/or injured hikers are common. In any given month there are at least a couple of news articles describing a tragedy involving a trail hiker. The purpose of this article is to discuss proper preparation for a trail hike outing, and ways increase our chances of survival, should an unexpected event occur on the trail.

Recent Examples:

Here are two tragedies that have occurred just since the start of 2013. I have highlighted learning points in the text of each article:
 
FOX NEWS January 14 – Caught in freezing rain, Illinois man, 2 sons die while hiking on remote trail in Missouri: “On a weekend trip that was a surprise anniversary gift for his wife, an outdoors-loving Air Force veteran ventured out with two of his sons for a hike on a remote trail. Clad only in light jackets and sweaters, the three apparently didn't know how rapidly the weather would turn ugly… and that proved deadly. The cold had killed them….It was nearly 60 degrees Saturday morning when Decareaux and his sons set out on the popular trail…they were ill-equipped as the temperature sank into the 40s, and a storm that would drop 2 inches of rain set in, making the trail all but impassable…A passer-by spotted the hikers more than three hours into their journey and asked if they needed a ride but Decareaux declined, telling the man they could make it back. The sheriff said, "They just missed their turn back to the lodge. When it's dark you can't see the back of your hand.” The [overnight] temperature had dipped to the upper 20s by sunrise. No autopsies were planned, and the deaths were attributed to hypothermia.”

L.A. TIMES January 14 – Hiker recovering after rescue from Angeles National Forest: “An Arcadia man was in the hospital Monday after he was rescued from the frigid Angeles National Forest, where he had been hiking with friends. He survived 26 hours in the freezing cold, said Los Angeles County sheriff’s officials... [The man] and two friends went hiking in the West Fork area of the forest and attempted to go north on a trail in the late afternoon Saturday…. [The man] got separated from the group about 6 p.m. and endured below-freezing temperatures overnight as searchers tried to locate him…[the man] had only a light jacket and no flashlight, but search-and-rescue personnel found him walking.”
 
As you can see, any discussion of hiking safety has to begin with acceptance that mechanical accidents can occur, that weather can change rapidly and severely, and that we can become disoriented and lost. There is no room for over-confidence or arrogance when dealing with nature.
 
About 68% of missing hiker incidents occur in wilderness areas. With training and proper preparation, we can minimize our risk, and increase our chances of survival and rescue, should an unexpected event occur. As Canadian Bushcraft Instructor Mors Kochanski puts it, "The bush [woods] is neutral. It is neither for nor against me. My comfort depends on what I can do for myself and how much I know about using the bush materials around me."

Have a Hiking Plan:
Before we ever set foot upon a trail, we should obtain a map of the area and trail we intend to hike. Often maps can be found online, at regional Park Ranger offices, and at hiking and camping related businesses.

We should thoroughly familiarize ourselves with the trail we intend to hike and make reasonable estimates of how much time and effort your hike will require and plan our trip accordingly. We should also check updated weather reports for at least a day or two in advance of our hike, so that we can be aware of any changes, especially forecasts of severe weather. For safety, ALWAYS cancel if severe weather is forecast.
 
We should prepare a written hiking plan and leave a copy with a friend or family member. The plan should include essential information such as the date and time of our departure and return, as well as a “deadline” to notify search and rescue personnel.

Once you have established a hiking plan, it is extremely important that you not deviate from the plan whatsoever. Doing so could send searchers in the completely wrong location and delay rescue.
 
Hike with a Partner:
Whenever possible, it is very advisable to hike with a friend. If either you or your friend become injured, a second person is there to render First Aid or go get help. Having a companion is also safer for thwarting potential attacks by both 2 and 4-legged trail predators.
 
Priorities of Survival:
“The Rule of 3’s” is a common tool used in teaching survival: We can survive 3 minutes without Air, 3 hours without Shelter, 3 days without Water, and 3 weeks without Food. Air is a given, so if we become lost, our immediate priority is PROTECTION [shelter from weather, possibly fire making to maintain correct body temperature for conditions]. Our next consideration should be RESCUE [signaling], next is WATER procurement, and finally FOOD. British survival instructor Bear Grylls uses the phrase, “Please Remember What’s First” as an acronym to teach those four priorities of survival.
 
Start with Proper Clothing:
Clothing should be worn in layers. In that way, clothing can be removed or added as needed for the given weather conditions. Our goal is to maintain a core body temperature of 97-100 degrees and avoid overheating [Hyperthermic] or becoming too cold [Hypothermia].
 
Protecting your head from heat and cold is crucial. In cold conditions a wool pullover is an excellent choice. We lose about 20% [some claim as much as 40-50%] of our body heat through the top of our head, and a wool cap will keep your head warm, even when wet. They are inexpensive and available at camping and surplus stores. Always carry one in your kit in case of weather change. In hot conditions, a broad-brimmed hat with a tall crown will create shade and protect you from sunburn. The tall crown will create an air gap that will keep your head cool.
 
Gloves are a wise choice. In cold or wet conditions, wear woolen gloves with a wind and water proof outer glove shell. In hot conditions, wear a thin pair of leather gloves to prevent sunburn and protect your hands from thorns and thistles as you hike through vegetation.
 
In cold or wet weather, a wind and water-proof hooded jacket or coat is a good choice, with a light fleece or wool pullover, and a light shirt beneath that. These layers create “dead air” spaces that insulate you and help maintain warmth. A scarf helps conserve heat loss around the exposed neck. Pants should be a tight weave fabric to repel wind and water
 
Footwear should be a lightweight hiking boot with water-proof qualities [tennis shoes will not protect your feet from cold and wet, or impact with rocks in the trail]. The boots should be sized to permit you to wear 2 pairs of socks for comfort and to prevent blisters from forming. Wool or wool blend socks should be considered, as they will help
 
Minimal Kit for the Trail Hiker:
Wilderness survival instructor Dave Canterbury [thepathfinderschoolllc.com, Discovery channel DUAL SURVIVAL] teaches that survival is all about “conservation”…conserving calories, core body temperature, and body fluids until rescue can be affected.

When it comes to trail kit, Canterbury teaches what he refers to as “The 5 C’s of Survival” – Five kit items he feels are absolutely essential and must be carried whenever you are hiking or trekking. Canterbury states that these items will help you to survive being lost for a period of 24 to 72 hour. They are as follows:

1. Cutting tool – A good quality knife large enough to cut down a sapling, but small enough to perform fine carving tasks as well. A fixed or folding blade knife with a 3-4” blade is usually adequate [see APPENDICES 4].

2. Combustion device - A good Ferro cerium fire steel will give you fire for many hundreds [or even thousands] of strikes. An alternative would be a magnesium bar with a Ferro rod built into it.

3. Cover – Protection from inclement weather or the sun. A disposable poncho and/or an emergency “Space Blanket” are very good choices, although even a paint drop cloth or shower curtain from the DOLLAR STORE can also be used for the purpose of shelter if money is limited. A wool blanket is also an excellent choice as wool retains its insulative qualities even when wet.

4. Cordage – Cordage is essential for many uses such as lashing a shelter frame together, snares, etc. Personally, I like carrying a roll of Jute twine, which can be broken down into two or three smaller strands, and can also be used as a fire tinder when unraveled and teased into a nest. 550 Para cord [sheath and 7 inner strands and tarred Bank Line also work well.

5. Container – A steel cup or single-walled bottle that can be used to gather, boil, and disinfect water is essential. If you cannot make fire it may be advisable to drink untreated water rather than to risk death by dehydration before rescue.


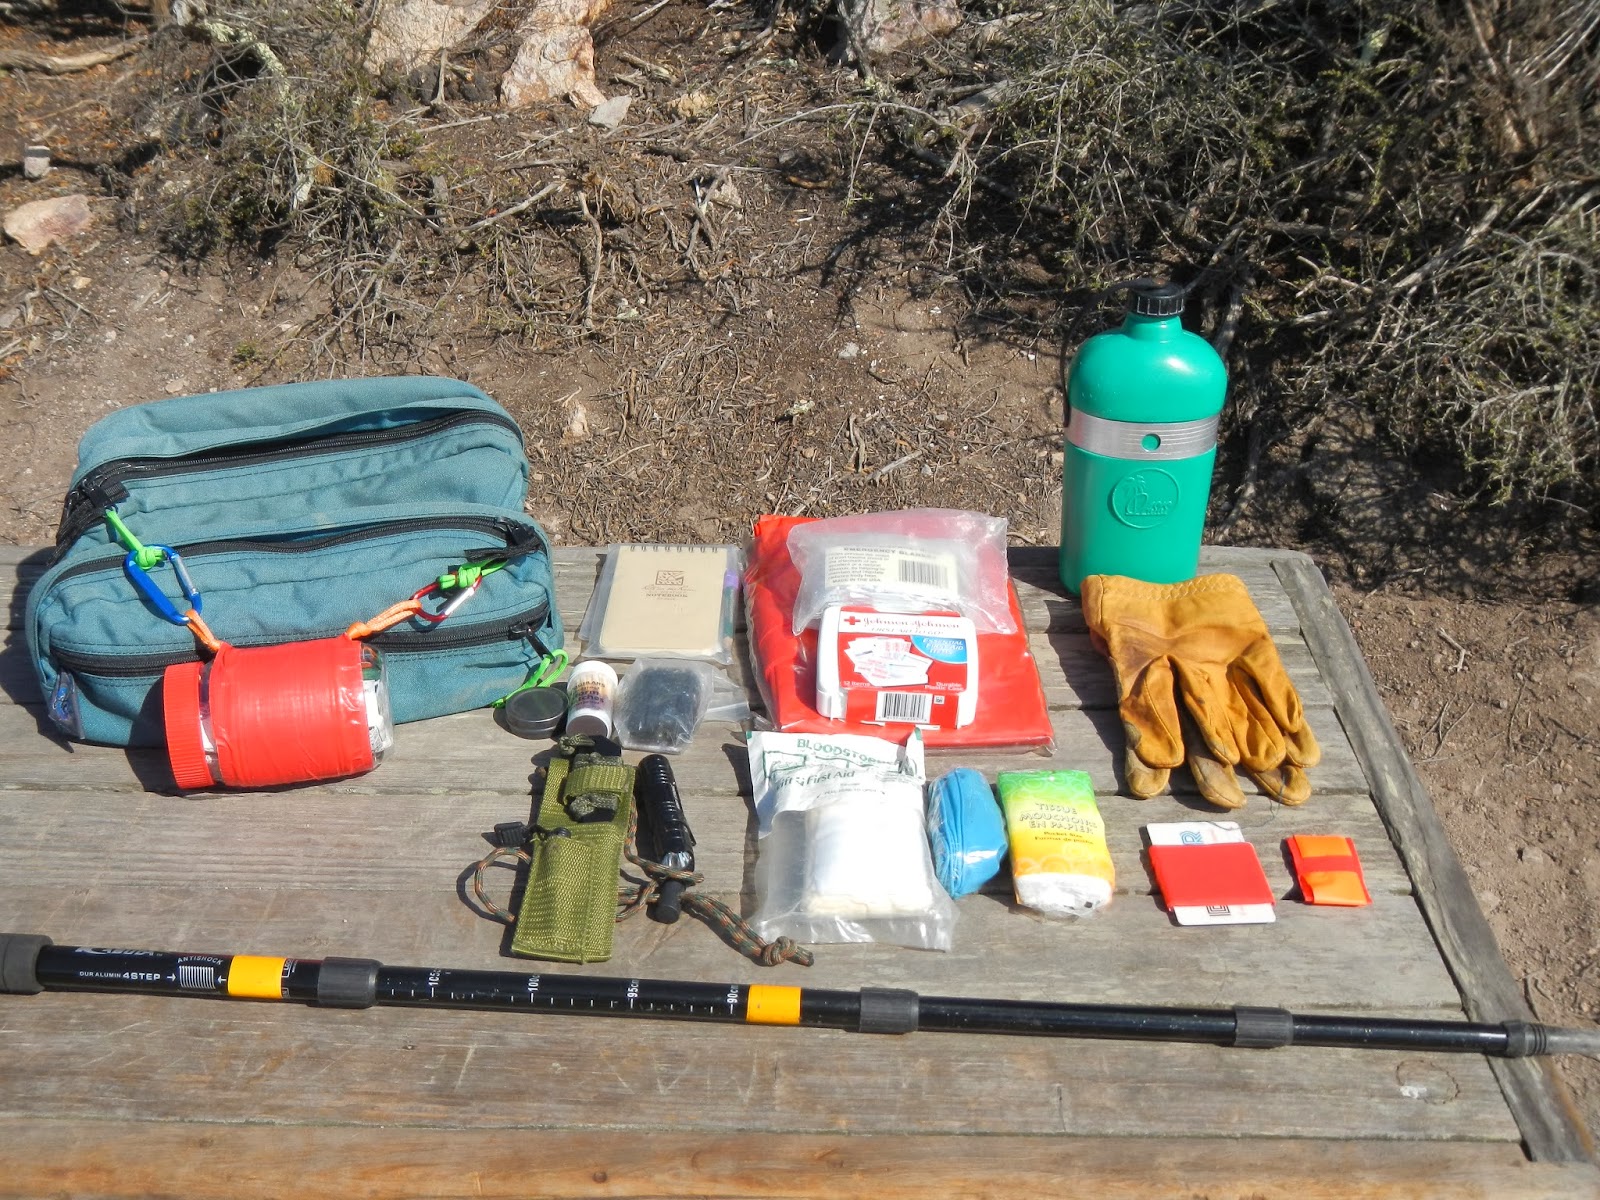
In the photograph above, we see examples of the 5 “C” items that should be considered absolute minimal trail kit for a day hiker, including: a CONTAINER [A steel canteen. Water can be gathered and boiled and thus purified in it]; CORDAGE [Jute cord which, when unraveled, makes a very good fire tinder nest material]; COVER [a disposable poncho shelter in rescue orange and a “Space Blanket” for warmth]; COMBUSTION [2 means of making fire for protection/signaling/warmth, specifically waterproof matches and a magnesium bar shown here]; and CUTTING [a multi-tool knife with saw]. Also shown in the photograph are a Flashlight and a Light stick for signaling or finding your way in darkness]. All of these items can easily fit into a fanny pack or a daypack.


I would also recommend adding a good quality compass, a signaling device [whistle and/or mirror], and a small First Aid kit to your trail kit. A few water purification tablets and some tissue for field-expedient latrine would be good additions as well.

Many of these items can be found at garage sales. Old U.S. G.I. stainless steel canteens are common and can sometimes be bought for .25 cents or so. They can be heated with the cap off and a boil achieved to sterilize water. Place the warm canteen against your kidney [outside your clothes] and you can warn your blood as it circulates. Another source is the DOLLAR STORE.

Recently, I was perusing the shelves at the local DOLLAR TREE store and I saw items that could be used to easily make a 5' C's Trail Kit for under $10.00: 1.) COMBUSTION: Cotton balls/Petroleum Jelly [Fire Tinder] and Penny Matches. 2.) CUTTING: Paring knife with blade cover. 3.) COVER: Shower curtain. 4.) CONTAINER: Aluminum water bottle, single walled [can boil/sterilize]. 5.) CORDAGE: Cotton Twine, 420' [can be braided] or Nylon clothesline. Hmm, that's only $7.00 so we can add a mini-First Aid kit and a whistle or mirror and still have money left for the sales tax.
 
If you are planning for a full day excursion, you should consider an expanded trail kit [an expanded kit is shown in APPENDICES 1-4]. You should already be wearing layered clothing that is appropriate to the weather in your area, but you should add gloves and additional clothing to an expanded trail kit.

Something to avoid is “Kit Mentality” – this is a tendency to become so caught up in gear and equipment that it becomes the driving force for the outing. The purpose of getting outdoors is to enjoy nature and relax. Too much gear is heavy and noisy and will ruin your outdoor experiences.
 
What else should I carry?

Besides the items listed above, you should carry any medications that you may need, such as for allergies or asthma. If you wear prescription eyeglasses, it is wise to carry a spare pair in case you fall and damage the pair you are wearing.

It is also highly advisable to carry a form of identification with emergency contact information. This should also include any medical conditions you may have and list any medications you may require and/or be allergic to.

Another item worthy of consideration is an ALTOIDS TIN MINI-KIT. This is a back-up survival kit that is carried in a pocket, on your person, at all times [The kit fits into an ALTOIDS mints tin, hence the name].The intent of this kit is to provide you with the means to survive if you lose your main trail kit or pack, such as being swept while crossing swift-moving water.

Finally, a hiking stick is very useful. It helps maintain balance on rocky or loose ground, and can be used as a pointer or for retrieving a dropped object [rather than reaching into brush and getting stung by nettle or snake bit].


In this photograph, we see an ALTOIDS tin containing the following items: [Left vertical row] Brass snare wire, Jute Cordage, Waterproof matches, 1 qt. bag [water collection]; [Center vertical row] Signal Mirror, Button Compass, Whistle, Pocketknife, Ferro cerium Rod/Striker; [Right vertical row] Fresnel Lens [solar fire making], Band-Aids, Pencil, Air-to-Ground Signal Sheet.
 

Lost or Injured…now what?

If you become injured, your first step is to remain calm, assess the injury, and determine whether it is POSSIBLE and/or ADVISABLE [two very different concepts] to hike out. If the answer is no, such as a severe laceration from a fall, your next step should be to treat the injury/treat for shock, seek shelter, and await assistance/rescue.
 
If you become lost, you have two choices: attempt to back-track your trail, or shelter in place and await rescue. Many people continue to keep walking on the same course in the hope of finding their way out, but most often this will only result in becoming even more lost. The rule is, if you are not sure, STAY PUT!
 
Wild Animals:

One of the questions that frequently arises is concern about wild animals such as Mountain Lions or Bears. The chances of being attacked are very small. You have a much greater likelihood of self-inflicted dangers [dehydration, mechanical injury or becoming lost] than an animal attack. However, we still need to practice awareness. I have written a document on this topic [“Wildlife Encounters - what hikers need to know”] which will help answer your questions regarding potentially dangerous wildlife.
 
PMA – *Positive *Mental *Attitude:

Having some survival knowledge and equipment to survive a trail accident is not enough. Having a Positive Mental Attitude [PMA] is hugely important to surviving being lost or injured in the wild. The ability to remain calm and work to meet priorities, improve your situation, and enhance your chances of rescue are critical.
 
A friend of mine served with a SAR unit in the San Joaquin Valley and described finding a missing bicyclist who appeared to have panicked after becoming snake bit. They located his body by following a trail of abandoned trail gear [common], including his hydration bladder. He was found to have died from shock within a mile of a community. This is truly a tragedy because he might still be alive today had he remained calm, thought through the problem, and kept a PMA.
 
Building your skills:

There are many good books and online sources, such as YOUTUBE videos, that can help you learn self-reliance and wilderness skills

In my opinion, the single best way to build your skills is to perform outings close to home. In my case, there is a state park with a dedicated campground for hikers and bikers. It charges a low fee for a campsite [$5.00; E-sites at MDO are $25.00]. At least twice a year I hike there and spend a day and night to try out new gear and practice fire-making skills. This helps sharpen my skills for outings to more isolated locations, and helps build confidence and comfort for staying out-of-doors. You should always try to practice at least one primitive skill set when on any outing.

Resources:

BUSHCRAFTUSA.com: A free forum for persons interested in learning bushcraft skills. The site is family-friendly and moderated for clean content. They also offer bushcraft skill lessons for free on a section of their forum.

BUSHCRAFT OUTFITTERS: Quality outdoor gear for the serious woodsman. Visit their website at http://www.bushcraftoutfitters.com/

CENTRAL COAST BUSHCRAFT: San Luis Obispo based group. Lots of good tips and information. Visit their FACEBOOK page. 
 
OJAI SEARCH & RESCUE HIKING PLAN: This is a really nice hiking plan pdf available from Ojai Search & Rescue. Fill one out and leave with a friend or family before you go out. Besides information of use to SAR personnel, it also includes a box for a map drawing of your planned hike.http://www.ojaisar.org/Files/HikingPlan.pdf

SELF RELIANCE OUTFITTERS [PATHFINDER SCHOOL, LLC]: Premier bushcraft school and supplier of bushcraft and survival equipment. Owned/operated by dave Canterbury [co-host of DISCOVERY CHANNEL'S "DUAL SURVIVAL" television show]  http://www.thepathfinderstore.com/


“SAFETY TIPS FOR TRAIL HIKERS” by Manny Silva, Central Coast Active magazine article: A discussion of personal safety from 2 and 4-legged predators on the trail http://www.centralcoastactive.com/flip-books/CCA5Flip/

SURVIVAL RESOURCES, INC: Excellent source for trail survival gear. Visit their website at 
http://survivalresources.com/
 

Appendices:


APPENDIX 1: Advanced Trail Kit [Left] fleece jacket, knit cap, wool gloves, leather gloves. Cap is especially important as you lose 50% of heat via top of your head; [Centre, top clockwise] 25' nylon rope, AMK 2.0 bivvy [4 oz.], Space Blanket, Emergency poncho, map/pencil/notepad, toiletries, Sierra cup/water purifying tablets, canteen and cover, flashlight/spare batteries, monoscope, energy food/drink mix, signal mirror [US MK3 Type 1], fire making kit; [Right] Daypack, First Aid/Trauma Kit, crash shears, POCKETMASK rescue breather. All items displayed on a blaze orange poncho, which makes excellent signal panel [NOT SHOWN: Knives, compasses].


APPENDIX 2: Fire Making Kit Tin containing Flint/steel, char cloth and jute tinder; 2 tinder sticks; magnesium bar/striker; match safe with matches and jute tinder; USAF 3/8" Ferro cerium rod mounted in deer antler. Dave "Pathfinder" Canterbury suggests having five means of making fire at your disposal [include 2-3 primitive skills in that] as nothing ever works all the time, every time.


APPENDIX 3: First Aid Kit Basic First Aid kit in green box at bottom; Emergency blanket, crash shears, pocket-mask, and lots of trauma dressings are essential for the trail. Trails have lots of perils [slides, falls, falling rock, etc.]. You or a member of your party [or a stranger] may require wound dressings for a fracture or laceration.


APPENDIX 4: Every Day Carry [EDC] Every Day carry or EDC, are those items that should always be carried on your person at all times….a knife and a spare means of making fire. In the photograph above we see a waterproof match safe, a small flashlight wound with Gorilla tape and a can opener is attached by Para cord. Knives [top to bottom] are: WESTERN 932 6" clip blade with saw blade; Gerber APPLEGATE-FAIRBAIRN folder; LEATHERMAN "Super Tool 200"; HARTZKOPF lock-blade pocketknife with saw blade; VICTORINOX "Spartan" pocketknife. Any of these knives are a good choice for urban or trail uses.


© 2013, MANNY SILVA, ALL RIGHTS RESERVED

Friday, October 11, 2013

Cerro Cabrillo tracking outing

Today I decided to go for a wildlife tracking outing at Cerro Cabrillo  [Cabrillo Peak:  35°21′08″N 120°48′54″W]20.8148997 , a day use unit that belongs to Morro Bay State Park [CA] just a mile or so from my home.

Cabrillo Peak is a volcanic plug and part of a chain of volcanic peaks here that are known collectively as "The Morro's" and also as "The Seven Sisters" to natives and longtime locals [They're sometime incorrectly called "The Nine Sisters" by people who want to count an offshore sea mount that has not conclusively been proven to belong to the system].

 
A view of The Morro's from atop Portola Trail


There are several trail heads around the perimeter of the property, but the day use area can most easily be accessed from the Quarry parking lot on South Bay Boulevard, about a half mile south of Morro Bay State Park Road. There is a parking lot with room for, I don't know, maybe a dozen cars or so. It's also infrequently patrolled by Rangers and hidden from road view, so be sure to lock up your valuables out of sight.

The Cerro Cabrillo day use trails are sun-exposed and there is no water, so make sure you take extra water and some trail necessities like a small First Aid kit, tissues, etc.


Fanny pack trail kit with water bottle &  First Aid kit

I started the hike at around 12 Noon, and there had already been many mountain bikers and hikers on the trail. This obliterates a good deal of the wildlife tracks made the night before and early that morning. It would be necessary to watch the cover along both sides of the trail and game trails leading away from the trail if I hoped to see any tracks. This is usually not a problem though, as most animals tend to hug the protection of the vegetation and chaparral closely in case they need to suddenly run and evade a predator.

Not far up the Quarry Trail I spotted a recently made oval-shaped dog track on a narrow game trail leading into the brush. Outside the opening there were none of these tracks, as would be expected of a hiker with a domesticated dog, so its possible this track was left by a Coyote hunting the cover:


Canine track, possible Coyote 


Just a short distance beyond I came across a pile of scat on top of a rock in the center of the trail. It was full of berries. It's hard to say what made this...could be a Raccoon. Basically, scat is made up of whatever the animal didn't digest. There's also purpose in placement; it's kind of a way for an animal to communicate it's territory to competitors. There was a game trail on one side, and that's common on these "boundary marker" scats:

 
Berries in scat

Be sure not to handle scat. It can be full of harmful parasites. If you must break one open to study contents, wear protective latex disposable gloves, use sticks to break up the material, and keep away from face and exposed skin.

Just a short distance beyond the scat pile I located a batch of tracks from a raccoon, which kind of supports this scat was made by one. In the photo below, the print from a front paw of a Raccoon is visible. they have long fingers on the front paw, which resembles a human hand. The rear paw is elongated and more closely resembles a human foot, however there were none that were photographic quality, so only the front paw is shown here: 


Front paw impression from a Raccoon

Another very common form of scat are pellets left by Jackrabbits and Cottontail rabbit's. These you will notice under the brush cover along the sides of trails, as this is where these animals tend to feed. They also stick to the cover for protection from predators like Bobcats.   


Rabbit pellet droppings
 
Another very common animal whose tracks are seen hereabouts in profusion are Black-Tail Deer. In the photo below, you can see deer tracks walking on top of tracks left the day before by hikers and bikers. These fresh tracks appear somewhat reflective of the sunlight. Trackers refer to this condition as "shine".

 
Deer track "shine"

 
Some animals [Bobcats, Mountain Lions, Foxes] have "direct register" tracks...in other words, when they move forward, the rear paw lands directly inside the print made by the front paw. Deer are "indirect register" animals, meaning their rear hoof will be close to, but not precisely inside, where there front hoof was placed: 

 
Deer hooves - indirect register

Sometimes you can spot an animal's den. In this photo, we see a den belonging to a Dusky-Footed Woods rat, a rodent common to this area:
 
 
Dusky-Footed Woods Rat den

Male Woods Rats build their dens in trees, thus, this is a female Woods Rat's den. The Woods Rat den as 4 chambers or rooms, which they line with leaves that are toxic to fleas.

The aboriginal peoples used to hunt Woods Rats using a long notched stick. They would push the stick into the den, probe to locate the rat, twist the notched end of the stick into the rat's fur, and then withdraw it from the den. The rat was cooked pretty much intact until it was charred and then they'd pulverize it using a stone mano [hammer stone or pestle] and a metate [a flat grinding stone] and consume bones and all!  

As I'd mentioned in my October 10, 2013 post, "Track Awareness", I am by no means an expert tracker, But I learn something new every time I get out on a trail and look for tracks and sign. Locating tracks requires that you develop knowledge of where animals move, how they use cover, and mark their territories, and this can only be learned through study and hands-on "dirt time".  

Happy tracking!


© 2013, MANNY SILVA, ALL RIGHTS RESERVED

Thursday, October 10, 2013

Track Awareness

In my post October 1, 2013 post, "Woods Stalking and Nature Observation", I touched briefly on wildlife tracking and suggested training yourself to become "track aware". I want to touch on this in a little more detail and give you a few tips to build skills that will help you to become an amateur tracker and enhance your outdoor adventures.

I will tell you, I am a hobbyist and by no means am I an expert. I have a very few rules I adhere to that work for me, but they allow me to enjoy my woods outings all the more by being track aware.

At it's heart, tracking is an ancient skill and art practiced by throughout the history of mankind. We humans got to the top of the food chain by cunning and intellect...and our ability to track and understand animal behaviors and sign. Many people's around the world like the Bushmen of the Kalahari still survive, hunting food animals through the use of this skill. Military, Police, and Search & Rescue organizations still rely on tracking in their operations.

A good first step toward becoming a tracker is to purchase or borrow a book on North American mammal tracks and then familiarize yourself with animal tracks and their characteristics.

There are some excellent guidebooks, however many can be quite pricey. Sometimes you can find inexpensive animal track pamphlets at your local state or federal parks. One booklet that I have used and recommend is "ANIMAL TRACKS [and using the track tracer] by Barry Breckling. I bought it many years ago but [I think] it may still be available from the Pine Ridge Association [ www.coepark.net/pineridgeassociation]. It has diagrams of common animal tracks, gait information, and also has a handy ruler scale on the rear cover.  

Another excellent book I own and enjoy is TRACKING AND READING SIGN by Len McDougall. This is a large hardcover book filled with photographs and information on how to track. He's also a member of the International Society of Professional Trackers [www.ispt.org], an organization that studies and promotes tracking skills.

Besides a reference guide, some tools to carry with you when tracking are a tape measure or pocket ruler, some sketching paper and a pencil, A digital camera is nice to retain images of tracks you find, but not necessary.

Learning to track requires that you put in "dirt time"... you have to get outdoors and get on a trail and start looking in the dirt. Most animals are active at dawn and dusk, and I find that the best results come from getting out early before people and vehicles start obliterating tracks from the night before.  Again, be knowledgeable of what animals live in your area and study their tracks in advance. You'll pick it up faster with some knowledge going in. 

"Track traps"...these are any area that can capture and retain a print for later evaluation. Check the dirt shoulders of roads and trails...predator animals tend to hunt along cover and prey animals hug cover for protection. Look under brush at the shoulders of roads and trails and you will likely see prints.  Muddy edges of puddles and ponds and streams are really good for retaining prints in the wet soil.

Study and learn to recognize the other signs and behaviors of animals: scat left on the trail, territorial rubbings and scrapings, game trails and bedding areas...all tell a story of an animal's passing through the area.

The most common track you'll encounter is that of humans. You'll become acutely aware of fresh shoe prints and disturbances that will convey the presence or passing of another person in the vicinity. With time and practice, you'll be come somewhat adept at aging tracks and knowing how recently the person was here, whether they were running or walking [pressure release/exaggerated toe dig], or even if they were tired or wearing a pack [dragging toe and or heel]. It's really gratifying when you follow a set of tracks and come upon the person wearing those shoes and realize it is who you have been tracking.

So those are my suggestions. Now get out on the trail, start looking and learning, and be TRACK AWARE!

 
Raccoon tracks on a muddy roadside. Raccoon tracks look like little
human hands, especially the front paws. Back ones are longer.


Possible Mountain Lion track, Montana de Oro State Park, CA


Same track with a Quarter for scale.


Deer track. Probably from a calf born this past season. 


© 2013, MANNY SILVA, ALL RIGHTS RESERVED


Monday, October 7, 2013

Paperclip cup stove...cheap and efficient!

While hiking today I decided to build a small twig fire and brew a cup of hot coffee. I used my folding E-tool to clear away dry grass and leaves and to scrape a small key-hole fire pit, which I banked and lined with rocks. I then cut some green wood stakes, sharpened the ends, and drove them into the ground to make a stand for my cup:


As I worked on the fire pit, I became aware of wind gusts and, noting the dry conditions, decided against having an open fire for safety. However, I always carry some ESBIT tablets and a steel paperclip cup from the Dollar Store in my trail kit for a field-expedient cook stove.

Two or three ESBIT tablets nest nicely inside the paperclip cup. The paperclip cup is perforated and draws air well, allowing a hot burn. I used to use ESBIT stoves but got tired of them collapsing and spilling water everywhere and extinguishing my fuel. In the photo below, you can see the paperclip cup stove brewing my coffee:


One ESBIT tablet will make a hot cup of water or coffee, but I do not recall ever having achieved a "rolling boil" with just one tablet. Surplus U.S. Military Trioxane tablets work excellent, but are hard to find, as they are no longer made [MRE's have a self-contained meal heater packet]. I have had poor results using the current military gel fuel packs, and STERNO is a waste of time and money in my opinion. 

Always be aware that even the green wood pegs will dry out and burn during the process. Be watchful and attentive to your fire and keep water and a shovel or E-tool handy for safety. The wind was blowing the flame, robbing some heat, and you can see two of the pegs became charred:


After enjoying my coffee I poured water on the charred pegs and then coated them with thick, wet mud to ensure they were completely extinguished.  A paperclip cup stove works well and only costs a dollar, versus the $7 to $10 dollar ESBIT stove. If I forget or lose it, it is no loss.
 
 
One other thought: a quick and easy alternative to fashioning wooden pegs is to go to your hardware store and buy some 3/8 in. x 10 in. galvanized-steel spike nails. the flat heads work well for a cup or pot stand and they will not burn. Also, you can double-duty them as tent or tarp shelter stakes or for a spear point, digging tool, etc., although they'll add a fair amount of weight to your pack. 


© 2013, MANNY SILVA, ALL RIGHTS RESERVED
 

Sunday, October 6, 2013

Woodsman's Zip Loc bag

A lot of outdoor instructors suggest carrying a 1 quart zip loc bag for water collection in an emergency. But if you don't have one, here's a neat trick that can use any plastic bag strong enought to hold water...a "Woodsman's Zip Loc Bag". It's a field-expedient means of collecting/carrying water if you lack a canteen or don't wish to cross-contaminate your canteen with water that has not yet been disinfected.

This is also an example of how you really can self-instruct using books and video's...in this case, I learned the method from one of the excellent BUSHCRAFTMYWAY Youtube channel video's that I have watched online [I'll attach the link below].

All you need for this project is a plastic bag, a piece of green wood, and some cordage:


I like to use the liners from cereal boxes because they are a very tough plastic [and free]. I carry a couple in my day pack for emergency water collecting purposes. Using a knife, carefully split a piece of green wood:


Fill the bag with water. Extra air is bled from bag and one piece of the split wood is rolled into the spare plastic. The second piece is applied to prevent unraveling of the bag. A piece of paracord serves to lock the 2 pieces of wood together and to act as a handle for carrying.

Here you can see the completed bag and how it works. The bag is filled with water [2 measured quarts]:


Here is a close-up of the cordage and lock assembly. This system works well and if the bag is tough enough material, can even be lashed to your pack to transport water:


And, to give credit where credit is due, here is the excellent BUSHCRAFTMYWAY video with instructions on this technique:

 http://www.youtube.com/watch?v=naZoj2f6Pdg


© 2013, MANNY SILVA, ALL RIGHTS RESERVED


Tuesday, October 1, 2013

Woods stalking and nature observation

When I first started spending time on trail, my outings were built around gear and fitness. I've always been a bit of a "gear geek", and so I'd always tend to "over pack" for my day hikes and outings. I have gotten better, but sometimes I still take quite a bit of trail kit with me, especially on my longer outings. I also focused my early outings on fitness...carrying a pack load and covering a lot of ground quickly.

Over time, my interest in wildlife and useful plants began to grow. I began taking photographs of plants and animals that interested me, and tracks and signs left by animals.


Mountain Lion track - El Chorro Regional Park

As I became more comfortable in the woods and on trails and develop bush craft skills, I began to shed a lot of the gear I'd previously carried, choosing instead to take a minimalist approach. I've developed some personal practices that work well for me for nature observation when hiking, and I am going to share them in this article. My wish is that you will find them useful and that they will enhance your outdoors experiences.

My first suggestion is that you choose trail clothing that is soft, quiet, and protective. Stiff canvas clothing can be very noisy when moving through thick brush. Fleece hunting clothes are often designed for quiet movement and are ideal for nature observation as well. Military uniforms are also designed to be quiet and are camouflaged and can be bought used for little money.

You should wear gloves so that if you drop something and react without thinking, you will be  less apt to run your hand onto stinging nettle or into Poison Oak or Sumac, and will protect your hands if you need to move a branch away from you. Keep your arms in close with your center line so you can move more easily through brush and narrow trails and avoid contact with these plants.

Shoes should be flexible, light, and soft rubber soled. Moccasins are okay for stalking but can be slippery to walk in. Soft soles moc's allow you to feel dry branches under foot before applying weight and snapping them.

Keep your trail gear items at a minimum, and store them in a pack. If you must bring them, wrap metal objects with duct tape or cloth to quiet them Store keys in a pocket so they do not rattle.

Develop your personal awareness of the environment around you by learning to use all of your senses. Some people like to walk in the Indian stalking  fashion, and that is fine, but I don't know that it is absolutely necessary unless moving through dry leaf litter or some other noisy medium. What you do need to do is to move slowly with your head up, taking in all of your surroundings. Keep your vision unfocused so that you'll pick up subtle movements faster within your field of view. Consider that you are moving in a sphere and be aware of all around, above and below you.


 Dusky-Footed Woods Rat nest.  The males make their nests
In the tree, while the females build theirs on the ground.

Strive to move in rhythm with the natural surroundings. If you move with a measured, peaceful pace, wildlife such as birds will be more apt to allow you to come closer. If an animal steps onto the trail in front of you, you'll be better able to stop quickly and silently to observe them. Many animals only see in a gray hue and rely on smell, sound, and visual movement to cue them to an intruder's presence.

Only walk as fast as you can safely walk with your head up and absorbing everything. Be aware of material on the trail or trip hazards to avoid. The goal is to develop awareness of everything and to become adept at moving as closely to complete silence as you can.

Be track aware. Tracks [and scat] left by animals tell a story of what animals are using the trail. With time and practice, animal tracks can be discerned from amongst a patch of hiking boot prints. Over time you will develop awareness of even the smallest tracks of insects.

 
Beetle Track in soft sand

Process the smells of the environment as you walk. Is the air dry or damp [water source nearby or rain coming]?  Putrefaction odor would indicate a dead animal or possibly the meat-hide of a Mountain Lion [a safety issue]. Be aware of human smells [colognes, cigarette smoke, food cooking] which would indicate another person in close proximity. Odors that don't belong also tell a story.


Deceased Dusky-Footed Woods Rat found lying beside trail.
 
Sound awareness; Often in brush or heavy cover you may hear some animal's activity before you actually see it. Be aware of bird calls and alarms, or lack thereof when the woods fall completely silent. When you hear these cues you should train yourself to stop and assess what is the cause of the alarm.  If you inadvertently make a noise and generate an alarm, stop and assess what calls and activity your error has triggered. Be watchful for it may flush a wildcat or other animal from a bedding or hide where it was just napping.

As you move, pause to check your back trail often. At least every 100 meters look behind you.Sometimes you will see wildlife emerge from brush once they judge you have safely passed out of range. It also allows you to be aware if you are being followed by a predator [2 or 4 legged] which usually attack prey from behind.

I also find it useful to find a observation spot on a hillside and rest my back against a tree to watch and listen to the wildlife activity. I have had wildlife walk past me, unawares that I was seated there. I often hear alarm calls and within a moment or so a trail runner that was cause for the alarm calls will come running along the trail below me.

In heavy cover and narrow  trail, trekking poles can be noisy and can catch on brush, thus telegraphing your approach. I prefer a single pole of natural wood, as it is quieter. Be aware of the heavy pole striking ground and making vibration, another way of telegraphing your approach. I prefer to carry my hiking pole lance-like at a low ready position or at trail when not in actual use. A hiking stick is also very useful to recover dropped items by drawing them back to you instead of reaching into brush and becoming snake bit or stung.

Follow the LEAVE NO TRACE philosophy and be litter aware. Recover your own litter and collect litter left by others when you can. Collecting litter is useful for training the eye to see what is not natural and that which does not belong in the environment. It enhances observation skills. Consider carrying a trowel in your kit to use for burying your own scat and that of others. Garden trowels can be had for as little as .99 cents at HOME DEPOT and DOLLAR TREE and are useful for making a safe camp fire pit as well.

In closing, I hope these tips will help enhance your time spent on the trail. If nothing else, I would strongly urge readers of this post to get outdoors more often and spend time enjoying nature and observing wildlife. Excursions need not be long or arduous. Even brief exposure to the out-of-doors will enhance your health, both mentally and physically. And you'll be able to help give something back by collecting and removing litter items you find along the trail, many of which are injurious or toxic to foraging wildlife. Best of all, if you have children or grandchildren, you can be a positive influence and enhance their life experience by taking them outdoors and opening their eyes to the beauty of nature.


© 2013, MANNY SILVA, ALL RIGHTS RESERVED