Sunday, November 30, 2014

The "Fire Roll"

At one time or another, you may have seen a "Tool Roll". These are usually a multi-pocket bag constructed of leather or fabric. They are designed to hold a tool in each pocket, and can be rolled up and then fastened with ties attached to the outside of the roll. I usually see them equipped with expensive tools, like fine woodworking tools. A tool roll is good means of keeping a set or tools together so they do not become separated and possibly lost.

Periodically, I go to a public range to practice my marksmanship skills. While there I like to dig through the trash cans and look for anything I can use. One frequent discard I find are military ammunition bandoleers. They are fabric or vinyl construction, have multiple pockets and a shoulder strap. Sometimes the compartments have a button or snap closure, others a simple tuck-in flap. They were used to carry cartridges on metal stripper clips for reloading magazines. Most shooters usually just discard them after the cartridges have been depleted.

Military Bandoleers
 
Gear has a way of "migrating" and becoming lost in a day pack or bug-out bag, especially when you need it the most. So, sometime back I decided that a bandoleer would make a good way to assemble my fire-making components into one neat package. I like to carry multiple means of making fire, because the truth is that not everything works all the time under all conditions; lighters and matches can become wet and fail. You may not be able to find a way to shelter matches from strong gusts, so a torch lighter may be in order. This is another reason for a "Fire Roll"...it is a kit for keeping similar "valuable tools" together.
 
Be advised, quality varies widely in surplus bandoleers. Some have 4 compartments, some 5, and still others 6 compartments. I have collected are Turkish military 1950's construction intended for their 8mm Mauser battle rifle of that period and are constructed from a very gauze-like cotton fabric with a zinc button for closure.  The best I have found is a water resistant, high-quality nylon construction with snap closures and a weep-hole in the bottom of each compartment marked POOLE 1992. I have no idea what country made it.
 
My own "Fire Roll" is set up as follows [Photograph below, Left to Right]: Roll of Jute cordage for tinder nest making, Tin with Vaseline-soaked cotton balls; Ferro rod/striker; Common wooden matches, Wind/waterproof "Storm Matches", Lighter; COGHLAN'S Tinder stick, Candle, Fatwood stick wrapped with Jute cordage. 
 
'Fire Roll" contents
 
Ideally, the ties would be centered on the outside of the roll so it could be tied closed, but being a Bandoleer, they're sewn to the ends as shoulder straps to permit carry. I like the idea I could throw the bag over my shoulder , so I left them attached in that manner. You could cut and re-locate the straps if you wished, but it's a simple enough matter to just wrap the strap around the roll and then knot it closed, as shown below:
 
"Fire Roll" rolled up and tied
 
Besides firing range trash cans, I've seen these bandoleers at garage sales and surplus stores. I used to see scads of them in wastecans at a military base firing range where I used to take training, apparently discarded by soldiers after small arms training. I suppose if you knew someone in the Army National Guard they could possibly scrounge one from the trash for you.
 
And, a final bit of advice as I close this post... I would highly recommend that you always carry some means of fire-making in your pockets, upon your person, in addition to a Fire Roll in your pack.. Redundant systems ["Two is One, and One is None"] is critical to survival. If you become separated from your pack you will still have some means of making a fire upon your person. To this end, a DOAN's magnesium bar is a pretty safe bet, as it will always work, even in wet conditions, and has a ferrocerium rod incorporated into it which can be used to light natural or other synthetic tinders if desired.
 
Happy Hiking!

GOBLIN RANGER / BUSHCRAFT WOODS DEVIL


Saturday, November 29, 2014

Early Morning Breakfast Hike on Madonna Mountain

This morning I went on a pre-dawn hike up Cerro San Luis Obispo [Madonna Mountain] and made a hot breakfast and watched the sun rise from the summit.


Thursday, November 27, 2014

Making a neck lanyard fob for your Mora knife

Anyone who practices bushcraft skills is aware of the excellent FROST MORA line of knives. These knives are quality made in Sweden, rugged, hard-working, and quite inexpensive, often priced around $14.00 or even less. The carbon steel version is especially popular as it's spine can be used as an improvised striker for flint & steel firemaking.

Mora Knives [morakniv.se]
 
One of the unique features of these knives is that the hard plastic sheath has a springy hook that clips over the belt and can be easily removed or replaced. It also has a slot that allows it to be clipped onto a button for carry on the outside front of a coat or parka. 

A lot of folks like to wear the Mora knife around their neck [neck carry] on a lanyard, passing the lanyard through the belt tunnel. I decided that I wanted to make a leather fob for carrying my WAHOO KILLER [an even less expensive stainless steel Chinese-made copy of the Mora knife] around my neck. This is a fun and easy rainy day project. Here's how I did it:

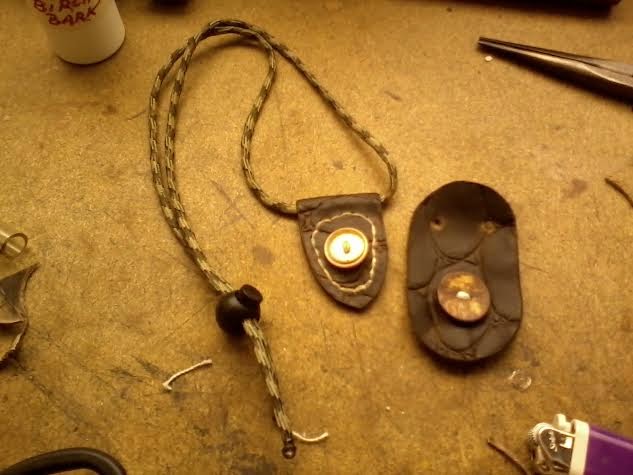
All that is needed is a piece of scrap leather, a button, a CORD-LOC and a length of paracord. Cut the leather into an oval, punch holes in the fob for the neck lanyard, and sew a button on. Below is the finished product:

Finished neck fob & lanyard
 
In the photo above, you can see the knife sheath's slot that accommodates a button [the piece of paracord and the button were found on the ground at a local park where I volunteer and collect litter]. Slide the button into the slot and you now have a neck knife. 

In the photo below is a variation, made using a folded over piece of leather with a tunnel for the lanyard.

Tunnel fob
 
This tunnel version fob requires a bit more sewing. Incidentally, these were made using only a pair of EMT crash scissors, kite string & a needle, and a common plastic button. The stitching holes were punched with a small nail and a ball peen hammer. A coat of Mink Oil waterproofing and the edges were burnished using a smooth stone picked up on a trail.
 
Clearly, you don't need expensive leather crafting tools to make the things you need! You also have the satisfaction of using things you have made by your own hand on your outings, something I find makes my hikes my memorable. 
 
Happy hiking!
 
GOBLIN RANGER / BUSHCRAFT WOODS DEVIL 

Sunday, November 23, 2014

Rucking the Poly Canyon Trail

Today I decided to go for a hike on the Poly Canyon Trail. This is a trail located to the rear of Cal poly State University in San Luis Obispo. The trail is about a 5.5 mile round trip with about 700' elevation gain. The trail head is located inside the campus, just off Perimeter Road. On weekends you can park in the nearby H4 parking lot for free.

Poly Canyon Trail head gate

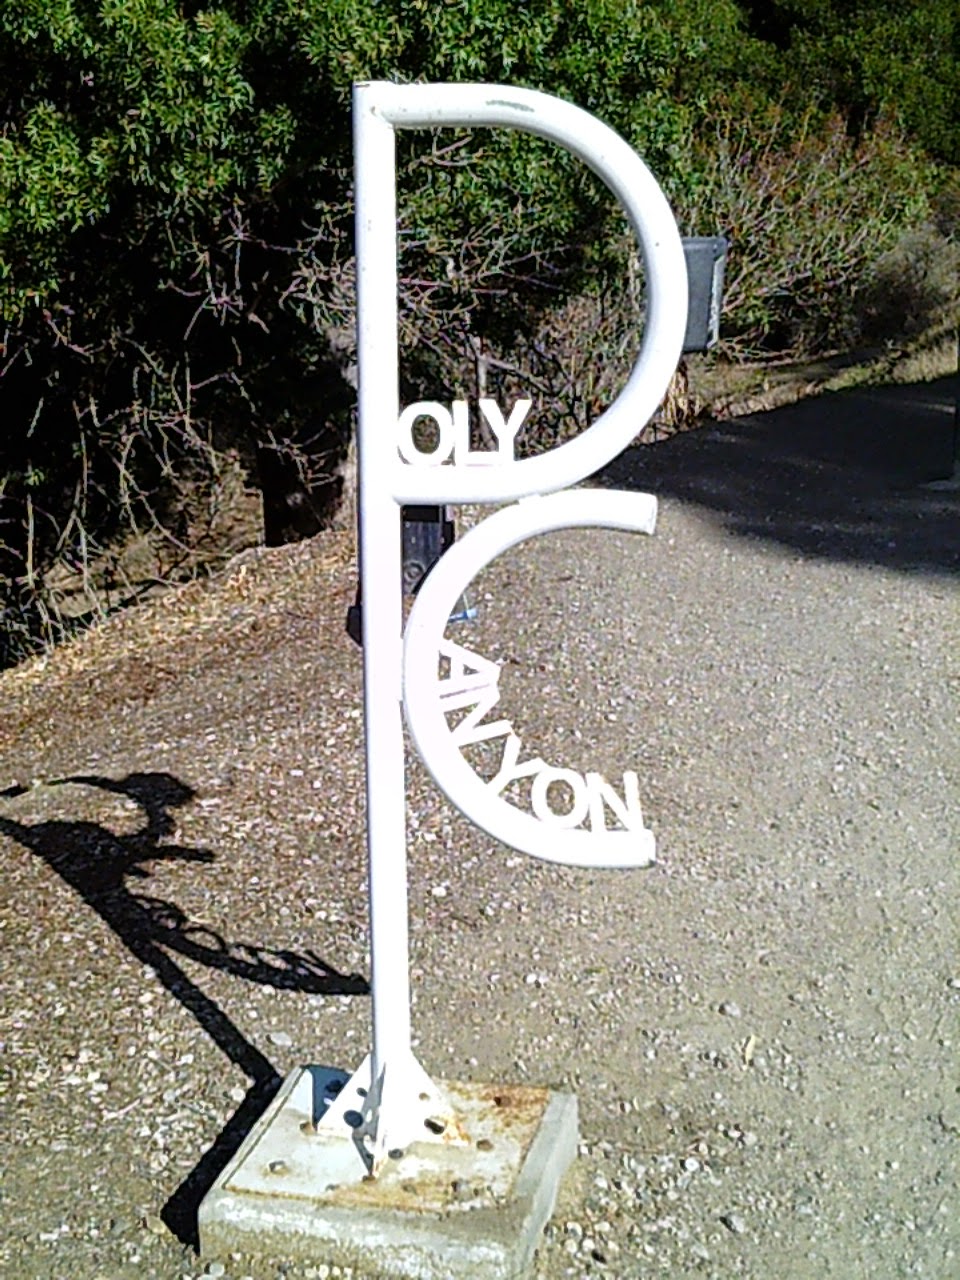
Interesting trail sign
 
It was a warm and sunny day, perfect for a hike. There were lots of Mountain Bikers, hikers, walkers, and runners using the trail, including several large families. The trail is actually a gravel road that runs north through the university ranch lands into the foothills behind the campus. Opposite the start of the trail, you can view some of the newer built student housing.

Poly Canyon Trail is a gravel road

Student housing
 
There was some water flowing in Brizzolara Creek, although not in volume nor very fast. Maps show the name as Brizziolario, an apparent misspelling by the United States Geodetic Surveyor's that mapped this area. Brizzolara was the name of a family that once owned this land, which was an 1824 Mexican Land Grant.

Water in the creek
 
The whole area was very rocky, a mix of volcanic stone, chert's, and Serpentine. There were lots of water channels worn into the rock hillsides. 

Water channels
 
At about 1 kilometer by my pace, I came across this architectural arch. It is the gateway to the university's "Poly Canyon Design Village", a, a series of structures designed and built by students from the architectural and engineering departments. A wooden interpretive guide to the village is located next to the arch.This is a separate trail of about 3 miles round trip and 300' elevation gain. 

Poly Canyon Arch

Guide to Poly Canyon Village displays
 
The Poly Canyon Trail continues to the right of the arch, over a bridge, and passes through some of the college's ranch operation structures.

Poly Canyon Trail, 1 km.
 
Passing the ranch house and barn, you can begin to see the foothills open up before you. There are no further structures of note beyond this point, although you will pass through several unlocked gates, secured by a chain. This is active cattle ranch land and it is important to re-chain the gate after passing through to prevent cattle from getting out. By my pace, GATE #3 is located 2 km. from the trail head.

Beautiful foothills
 
The photo below shows two posts flanking a tight "S" curve in the road. A boulder is located to the right. This is the 3 km. point.

3 kilometers from trail head
 
It was near this 3 km. point that I spotted a partial Black Bear track [front foot] impression in dried mud alongside the trail. This would've been made over a week ago when it rained last.

Black Bear track

Quarter Dollar coin for scale
 
The trail *officially* ends at the Union Pacific Railroad line, 4 kilometers [2.484 miles] from the trail head by my pace, but "DAY HIKES IN SAN LUIS OBISPO COUNTY CALIFORNIA" by Robert Stone gives the round trip distance as 5.5 miles, or 2.75 miles one-way. There is a gate here and mountain bikers were going in and out of it, probably riding the trails down from west Cuesta Ridge.   


Union Pacific Railroad tracks
 
 On this ruck, I carried a pack load of 17 lbs. with 1 quart of water in the hydration bladder.

Coleman "Elate" 38 liter hydration pack
 
This view from the top of the trail is excellent. Here is a view of Cerro Romauldo [left] and Hollister Peak [[right], part of the Morro's or "Seven Sisters".

Lovely view of The Morro's
 
Of course, I try to collect litter whenever possible. I spotted out trash on the way out and then collected it on the way back in. Not much along the trail itself, but lots of beer bottles, cans, and other items nearer to the trail head. Probably about 2 lbs. of litter total. A nice young lady , a student I suspect, stopped and complimented me saying thanks for my efforts, which is greatly appreciated recognition/encouragement.

2 lbs. of trail litter collected!
 
I took some moving footage, but it exceeded the BLOGGER.COM limit, so it wouldn't load. I will see if it'll load to my BUSHCRAFT WOODS DEVIL Facebook page.
 
In closing, I would state this is a great exercise trail with beautiful scenery and a great soil medium for observing wildlife tracks, especially after rain. If you are in this area I highly recommend this trail to you.

Happy Hiking!

GOBLIN RANGER/BUSHCRAFT WOODS DEVIL


Sunday, November 9, 2014

Crafting a Primitive Fat Lamp

Using native stone to craft an aboriginal fat lamp, like those used in Stone-Age Europe and byt the Aleut and Inuit peoples of the Arctic. Two local stones were used in the creation of the lamp: Sandstone, and a fragment of harder microcrystalline Volcanic Granite. The sandstone will form the lamp and the granite will serve as a tool to form the fat divot. In this photo I have begun the process of augering the divot:

Forming the divot
 
The granite auger was chosen for it's natural drill shape. It was sharp-edged as found and no modification was needed to form it into a tool. Here, I am forming the divot with the drill piece:
 
Drilling  stone
 
In this next photograph, I have formed a wick from some Jute cordage:

Forming a wick
 
The completed lamp in operation:
 
Cave heating, 38,000 B.C.
 
A small amount of animal fat drippings, maybe 2 tablespoons, was collected and poured into the divot. the jute wick was soaked in the fat and ignited. This lamp ran for around 30 or 40 minutes on the small amount of fat. The stone became very warm and could be used to warm the hands or sore muscles. 
 

GOBLIN RANGER