Tuesday, December 16, 2014

Shooting Colt's patent 1851 Navy revolver

One of my interests is shooting firearms, especially reproductions of historic black powder firearms. One of my favorites is my reproduction Colt's 1851 .36 caliber Navy revolver.

1851 Navy revolver
 
I bought it new from Cabelas several years ago and have shot it steadily over the years. I have used it to place at several black powder competitions and have even won a few ribbons with it. I believe that these revolvers have usefulness for Cowboy Action Shooting [CAS], target marksmanship, and could even be used successfully for small game hunting.

There is a mistaken belief that these firearms are inaccurate and I have found that in fact they are surprisingly accurate. These revolver's sights were originally regulated for about sixty yards, and at a distance of twenty-five yards I have found it necessary to aim about six inches low to place my shots in the black on a standard 25 yard bulls-eye pistol target.

Group shot at 7 yards
 
The sights are composed of a brass cone front sight and rear-sight notch cut into the hammer nose. They are not the best but seem adequate when I do my part. At twenty-five yards I can keep all six shots in the black; about an eight-inch circle, which is generally accepted as "combat accuracy". At fifty yards my groups spread out to about twelve inches, but still stay within the scoring rings.
 
Group shot at 20 yards distance
 
A little history on the Navy is in order. The predecessor of the Navy revolver, the "Walker" .45 caliber revolver, came about following the 1846 Mexican War. It was a powerful handgun, but heavy at 4-pounds,  9 ounces. The combat success of the "Walker" revolver led to public and military demand for a lighter, handier sidearm. Samuel Colt seized the opportunity and began production of a whole series of .44 caliber "Dragoon" or "Holster" revolvers, still quite heavy and usually carried in pommel holsters on a saddle. However it was not until 1851 that Colonel Colt designed a pistol that would finally meet the public requirements... the `51 Navy...which truly was the first practical "belt revolver", meaning it could be carried comfortably on the waist.
 
Between 1851 and 1873, somewhere around 325,000 Navy's were built. It was so popular that when it was discontinued, the grip frame was transferred into the newly designed Colt's Single Action Army cartridge revolver; The famed "Peacemaker". Even after it's technology was obsolete, people carried the Navy, which could be purchased used for around $2.00 and a pack of 6 paper cartridges for .75 cents...much cheaper than the Peacemaker's month's pay $25.00 price tag [equivalent today at about $479.00].
 
The graceful 7-1/2" octagonal barrel, coupled with the traditional Colt "plowshare" grip make for wonderful handling characteristics. It is very easy to see how a shootist like Wild Bill Hickok, who always carried a brace of Navy revolvers, was able to accomplish some of his shooting feats once you have fired a Colt's Navy. One of his demonstrations was to stand midway between 2 telegraph poles. Hickock drew, fired at one, spun and fired his other revolver ambidextrously, striking both poles.
 
Besides Hickock, the Colt Navy was the go-to handgun for Outlaws, Lawmen, and both sides during the War between the States. Colt set up a factory in London and produced a steel-framed Navy which was authorized by the British Army for individual purchase by Officers. Explorers Captain Sir Richard Burton and John Hanning Speke carried and used Colt's Navy revolvers on their African expeditions.

London Navy revolvers also saw combat in various British conflicts, including the Crimea and the 1857 Indian Sepoy Mutiny. However, the Navy's small bullet lacked needed stopping power for dealing with fanatical tribal warriors. Plus the British soldiers were often faced with overwhelming numbers of tribal peoples at close range and quickly decided they needed double-action revolvers for close quarters battle.  But, for the most part, the Colt's Navy was an adequately effective and accurate combat arm.
 
Combat target shot at 7 yards
 
The loading process is laborious: pouring a measure of 20 grains of FFFg black powder into each chamber, then seating a lubed felt wad and lead round ball over the chamber mouths. The ball is seated using the loading lever located beneath the barrel. Finally, a percussion cap is fitted to the cone at the rear of each chamber. The process takes about 3-5 minutes to complete.

Percussion caps, live and spent
 
One thing the shooter must be careful of is the spent brass percussion caps. Once fired they shatter and become very jagged and sharp and can cut your fingers if you try to remove them from the cones at the rear of the cylinder bare-handed. A stick should be used to remove and to seat them as well, as they can detonate when being pressed onto the cones.
 
Spent percussion caps
 
Another problem caused by percussion caps is jams caused by pieces of spent caps falling inside the revolvers action. The action is completely open at the rear of the cylinder and prone to this. There is some indication that shootists of the day would swing the revolver backwards while cocking it to allow the spent fragments to fall clear of the action, then bring the firearm back down onto target. This odd cocking practice is sometimes seen in old time cowboy movies in which they may have been emulating this practice.
 
Spent caps on cone;open action
 
Cleaning the black powder revolver was essential to ensuring performance. Black powder is hygroscopic, meaning it tends to draw moisture from the air, and burn less efficiently. Hickock was known to discharge his Navy's and reload them daily to ensure reliability...his life depended on it! They can easily be cleaned by disassembling them, washing in soapy water, then drying and lubricating them with a natural grease or lube. Petroleum-based lubricants react chemically with black powder and produce a thick, tarry fouling and must be avoided.
 
It was common in the Old West for Frontiersman to spread their revolver components on a rock, rinse them with the remnants of the leftover morning's coffee. A piece of twine with 2 rags, one lubed, one dry, were used as a pull-through and drawn through the barrel to finish the job. Typically, I use either Thompson Center "Bore Butter" or just everyday shortening to lube my pistol after cleaning.   
 
I'll conclude by saying that, in spite of the effort required to load and fire them, if you get the chance to do so, try shooting a black powder Navy revolver. They are fun and nostalgic to shoot and you will thoroughly enjoy the experience!
 
 
GOBLIN RANGER / BUSHCRAFT WOODS DEVIL


Sunday, November 30, 2014

The "Fire Roll"

At one time or another, you may have seen a "Tool Roll". These are usually a multi-pocket bag constructed of leather or fabric. They are designed to hold a tool in each pocket, and can be rolled up and then fastened with ties attached to the outside of the roll. I usually see them equipped with expensive tools, like fine woodworking tools. A tool roll is good means of keeping a set or tools together so they do not become separated and possibly lost.

Periodically, I go to a public range to practice my marksmanship skills. While there I like to dig through the trash cans and look for anything I can use. One frequent discard I find are military ammunition bandoleers. They are fabric or vinyl construction, have multiple pockets and a shoulder strap. Sometimes the compartments have a button or snap closure, others a simple tuck-in flap. They were used to carry cartridges on metal stripper clips for reloading magazines. Most shooters usually just discard them after the cartridges have been depleted.

Military Bandoleers
 
Gear has a way of "migrating" and becoming lost in a day pack or bug-out bag, especially when you need it the most. So, sometime back I decided that a bandoleer would make a good way to assemble my fire-making components into one neat package. I like to carry multiple means of making fire, because the truth is that not everything works all the time under all conditions; lighters and matches can become wet and fail. You may not be able to find a way to shelter matches from strong gusts, so a torch lighter may be in order. This is another reason for a "Fire Roll"...it is a kit for keeping similar "valuable tools" together.
 
Be advised, quality varies widely in surplus bandoleers. Some have 4 compartments, some 5, and still others 6 compartments. I have collected are Turkish military 1950's construction intended for their 8mm Mauser battle rifle of that period and are constructed from a very gauze-like cotton fabric with a zinc button for closure.  The best I have found is a water resistant, high-quality nylon construction with snap closures and a weep-hole in the bottom of each compartment marked POOLE 1992. I have no idea what country made it.
 
My own "Fire Roll" is set up as follows [Photograph below, Left to Right]: Roll of Jute cordage for tinder nest making, Tin with Vaseline-soaked cotton balls; Ferro rod/striker; Common wooden matches, Wind/waterproof "Storm Matches", Lighter; COGHLAN'S Tinder stick, Candle, Fatwood stick wrapped with Jute cordage. 
 
'Fire Roll" contents
 
Ideally, the ties would be centered on the outside of the roll so it could be tied closed, but being a Bandoleer, they're sewn to the ends as shoulder straps to permit carry. I like the idea I could throw the bag over my shoulder , so I left them attached in that manner. You could cut and re-locate the straps if you wished, but it's a simple enough matter to just wrap the strap around the roll and then knot it closed, as shown below:
 
"Fire Roll" rolled up and tied
 
Besides firing range trash cans, I've seen these bandoleers at garage sales and surplus stores. I used to see scads of them in wastecans at a military base firing range where I used to take training, apparently discarded by soldiers after small arms training. I suppose if you knew someone in the Army National Guard they could possibly scrounge one from the trash for you.
 
And, a final bit of advice as I close this post... I would highly recommend that you always carry some means of fire-making in your pockets, upon your person, in addition to a Fire Roll in your pack.. Redundant systems ["Two is One, and One is None"] is critical to survival. If you become separated from your pack you will still have some means of making a fire upon your person. To this end, a DOAN's magnesium bar is a pretty safe bet, as it will always work, even in wet conditions, and has a ferrocerium rod incorporated into it which can be used to light natural or other synthetic tinders if desired.
 
Happy Hiking!

GOBLIN RANGER / BUSHCRAFT WOODS DEVIL


Saturday, November 29, 2014

Early Morning Breakfast Hike on Madonna Mountain

This morning I went on a pre-dawn hike up Cerro San Luis Obispo [Madonna Mountain] and made a hot breakfast and watched the sun rise from the summit.


Thursday, November 27, 2014

Making a neck lanyard fob for your Mora knife

Anyone who practices bushcraft skills is aware of the excellent FROST MORA line of knives. These knives are quality made in Sweden, rugged, hard-working, and quite inexpensive, often priced around $14.00 or even less. The carbon steel version is especially popular as it's spine can be used as an improvised striker for flint & steel firemaking.

Mora Knives [morakniv.se]
 
One of the unique features of these knives is that the hard plastic sheath has a springy hook that clips over the belt and can be easily removed or replaced. It also has a slot that allows it to be clipped onto a button for carry on the outside front of a coat or parka. 

A lot of folks like to wear the Mora knife around their neck [neck carry] on a lanyard, passing the lanyard through the belt tunnel. I decided that I wanted to make a leather fob for carrying my WAHOO KILLER [an even less expensive stainless steel Chinese-made copy of the Mora knife] around my neck. This is a fun and easy rainy day project. Here's how I did it:

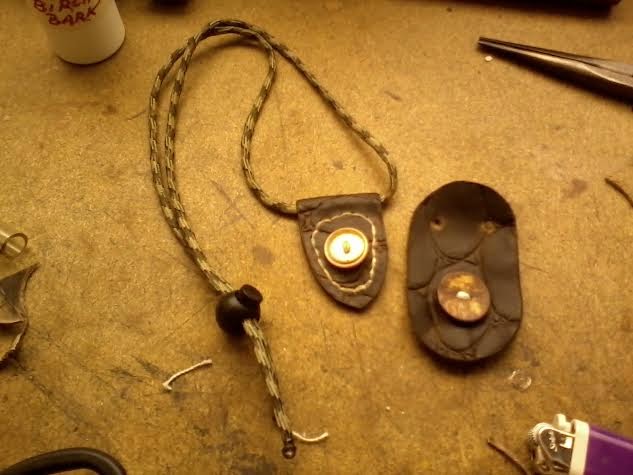
All that is needed is a piece of scrap leather, a button, a CORD-LOC and a length of paracord. Cut the leather into an oval, punch holes in the fob for the neck lanyard, and sew a button on. Below is the finished product:

Finished neck fob & lanyard
 
In the photo above, you can see the knife sheath's slot that accommodates a button [the piece of paracord and the button were found on the ground at a local park where I volunteer and collect litter]. Slide the button into the slot and you now have a neck knife. 

In the photo below is a variation, made using a folded over piece of leather with a tunnel for the lanyard.

Tunnel fob
 
This tunnel version fob requires a bit more sewing. Incidentally, these were made using only a pair of EMT crash scissors, kite string & a needle, and a common plastic button. The stitching holes were punched with a small nail and a ball peen hammer. A coat of Mink Oil waterproofing and the edges were burnished using a smooth stone picked up on a trail.
 
Clearly, you don't need expensive leather crafting tools to make the things you need! You also have the satisfaction of using things you have made by your own hand on your outings, something I find makes my hikes my memorable. 
 
Happy hiking!
 
GOBLIN RANGER / BUSHCRAFT WOODS DEVIL 

Sunday, November 23, 2014

Rucking the Poly Canyon Trail

Today I decided to go for a hike on the Poly Canyon Trail. This is a trail located to the rear of Cal poly State University in San Luis Obispo. The trail is about a 5.5 mile round trip with about 700' elevation gain. The trail head is located inside the campus, just off Perimeter Road. On weekends you can park in the nearby H4 parking lot for free.

Poly Canyon Trail head gate

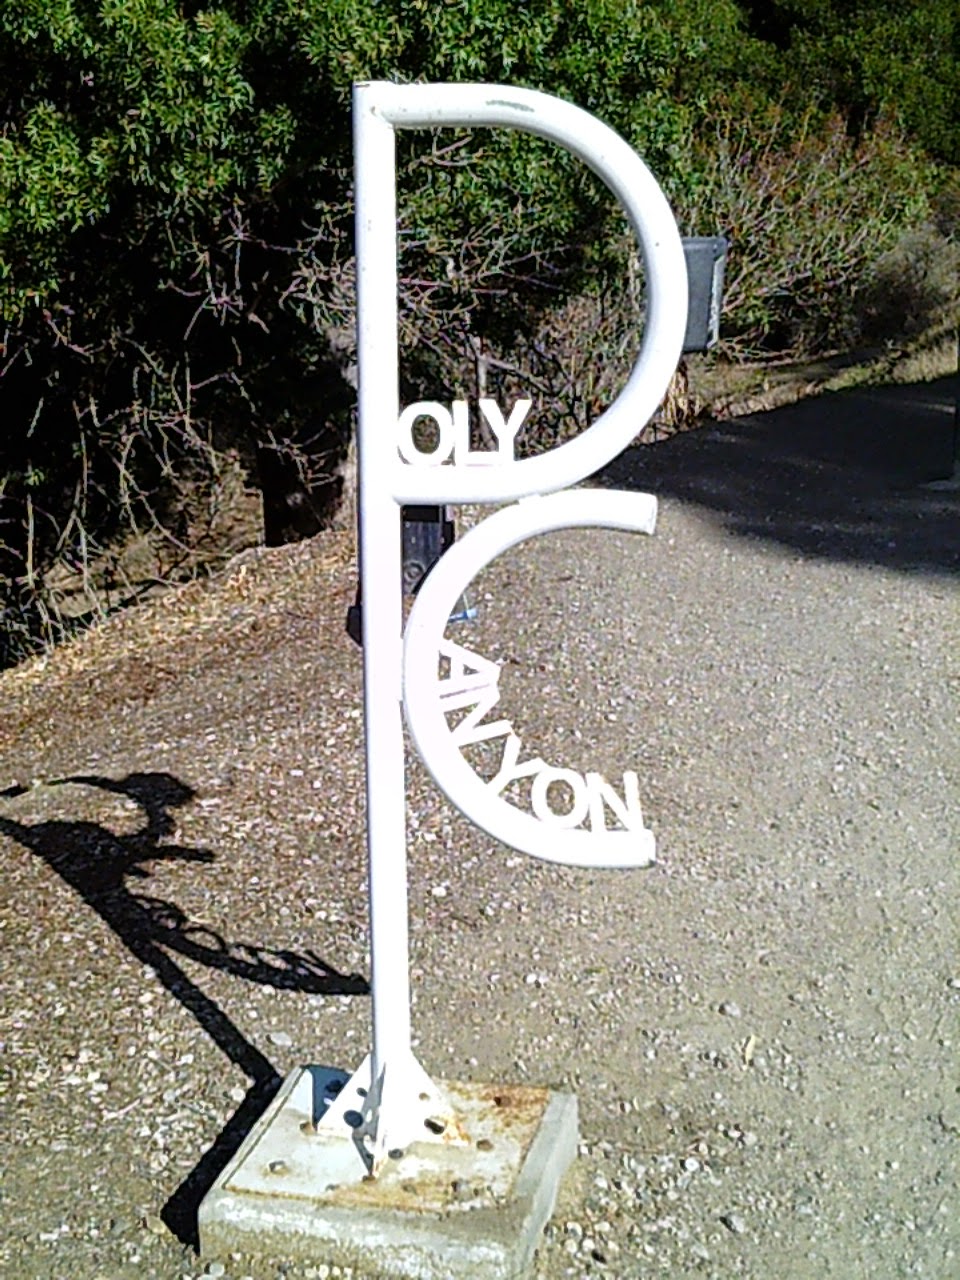
Interesting trail sign
 
It was a warm and sunny day, perfect for a hike. There were lots of Mountain Bikers, hikers, walkers, and runners using the trail, including several large families. The trail is actually a gravel road that runs north through the university ranch lands into the foothills behind the campus. Opposite the start of the trail, you can view some of the newer built student housing.

Poly Canyon Trail is a gravel road

Student housing
 
There was some water flowing in Brizzolara Creek, although not in volume nor very fast. Maps show the name as Brizziolario, an apparent misspelling by the United States Geodetic Surveyor's that mapped this area. Brizzolara was the name of a family that once owned this land, which was an 1824 Mexican Land Grant.

Water in the creek
 
The whole area was very rocky, a mix of volcanic stone, chert's, and Serpentine. There were lots of water channels worn into the rock hillsides. 

Water channels
 
At about 1 kilometer by my pace, I came across this architectural arch. It is the gateway to the university's "Poly Canyon Design Village", a, a series of structures designed and built by students from the architectural and engineering departments. A wooden interpretive guide to the village is located next to the arch.This is a separate trail of about 3 miles round trip and 300' elevation gain. 

Poly Canyon Arch

Guide to Poly Canyon Village displays
 
The Poly Canyon Trail continues to the right of the arch, over a bridge, and passes through some of the college's ranch operation structures.

Poly Canyon Trail, 1 km.
 
Passing the ranch house and barn, you can begin to see the foothills open up before you. There are no further structures of note beyond this point, although you will pass through several unlocked gates, secured by a chain. This is active cattle ranch land and it is important to re-chain the gate after passing through to prevent cattle from getting out. By my pace, GATE #3 is located 2 km. from the trail head.

Beautiful foothills
 
The photo below shows two posts flanking a tight "S" curve in the road. A boulder is located to the right. This is the 3 km. point.

3 kilometers from trail head
 
It was near this 3 km. point that I spotted a partial Black Bear track [front foot] impression in dried mud alongside the trail. This would've been made over a week ago when it rained last.

Black Bear track

Quarter Dollar coin for scale
 
The trail *officially* ends at the Union Pacific Railroad line, 4 kilometers [2.484 miles] from the trail head by my pace, but "DAY HIKES IN SAN LUIS OBISPO COUNTY CALIFORNIA" by Robert Stone gives the round trip distance as 5.5 miles, or 2.75 miles one-way. There is a gate here and mountain bikers were going in and out of it, probably riding the trails down from west Cuesta Ridge.   


Union Pacific Railroad tracks
 
 On this ruck, I carried a pack load of 17 lbs. with 1 quart of water in the hydration bladder.

Coleman "Elate" 38 liter hydration pack
 
This view from the top of the trail is excellent. Here is a view of Cerro Romauldo [left] and Hollister Peak [[right], part of the Morro's or "Seven Sisters".

Lovely view of The Morro's
 
Of course, I try to collect litter whenever possible. I spotted out trash on the way out and then collected it on the way back in. Not much along the trail itself, but lots of beer bottles, cans, and other items nearer to the trail head. Probably about 2 lbs. of litter total. A nice young lady , a student I suspect, stopped and complimented me saying thanks for my efforts, which is greatly appreciated recognition/encouragement.

2 lbs. of trail litter collected!
 
I took some moving footage, but it exceeded the BLOGGER.COM limit, so it wouldn't load. I will see if it'll load to my BUSHCRAFT WOODS DEVIL Facebook page.
 
In closing, I would state this is a great exercise trail with beautiful scenery and a great soil medium for observing wildlife tracks, especially after rain. If you are in this area I highly recommend this trail to you.

Happy Hiking!

GOBLIN RANGER/BUSHCRAFT WOODS DEVIL


Sunday, November 9, 2014

Crafting a Primitive Fat Lamp

Using native stone to craft an aboriginal fat lamp, like those used in Stone-Age Europe and byt the Aleut and Inuit peoples of the Arctic. Two local stones were used in the creation of the lamp: Sandstone, and a fragment of harder microcrystalline Volcanic Granite. The sandstone will form the lamp and the granite will serve as a tool to form the fat divot. In this photo I have begun the process of augering the divot:

Forming the divot
 
The granite auger was chosen for it's natural drill shape. It was sharp-edged as found and no modification was needed to form it into a tool. Here, I am forming the divot with the drill piece:
 
Drilling  stone
 
In this next photograph, I have formed a wick from some Jute cordage:

Forming a wick
 
The completed lamp in operation:
 
Cave heating, 38,000 B.C.
 
A small amount of animal fat drippings, maybe 2 tablespoons, was collected and poured into the divot. the jute wick was soaked in the fat and ignited. This lamp ran for around 30 or 40 minutes on the small amount of fat. The stone became very warm and could be used to warm the hands or sore muscles. 
 

GOBLIN RANGER

Sunday, October 26, 2014

10-Step Tracking Drill: developing your mantracking skills

This morning I was out of the house early. I went out to the park where I volunteer and perform trail maintenance and litter sweeps. I decided that since it was so nice out I would lay down some tracks and practice search tracking [also called mantracking or "tactical tracking", depending on your purpose]. I use a method called a "10 Step Drill"that can be done to improve your basic tracking skills. Here's how it works:

Early morning and late afternoon are the best times of day to track. the sun is at a low angle and thus casts shadows on the grounds surface. Prints "pop up" and become much more visible due to this contrast. As the sun climbs overhead, the trail becomes "washed out" by the light, making it much more difficult to perform tracking. A side benefit to morning tracking is that you get to see tracks left by animal activity the night before, before they are trampled by hikers. I saw several tracks this morning:

Raccoon Tracks
 
Deer Tracks, Indirect Register
 
To start, you take your tracking stick [a lightweight 4' long stick or hiking pole, marked in 1" increments with some bright colored rubber bands wrapped around it] and select a section of soil that you want to practice on. If you are just starting out or out of practice, select a clean soil surface and make a line across the trail or path. Your first step should be upon or just ahead of the line as a starting point for the training drill...just like you would "cut sign" [locate where the subject's track begins, as in a real search or fugitive tracking mission]. 

Next, walk nine more steps steps, and then make a second line across the path where the last track lands. Using your tracking stick, now set the gait [distance between steps from the leading foot heel to the trailing foot toe]. Place tip of stick at leading foot heel and roll a rubber band into place at the toe of the trailing foot. Then roll another rubber band to the trailing foot heel to set that foot length. Now you have a means of approximating the location of the next track even if it is not clearly visible:

 
Gait set, next track approximated
 
I like using the tracking stick because it gives me an *approximate* range of where next track should be. I say "approximate" because stride changes as one ascends [shortens] or descends [lenghtens] unless really steep and then REALLY shortens to control the descent....just like how pace counting changes depending on terrain]. A lot of this morning's drills were done on an inclined trail and in the photo's you may notice the heel cut is 6" behind the tip because I didn't re-set gait for the terrain changes from level.
 
[TIP: People tend to land their heel first when walking, roll the foot to the ball, then push off on ball of foot; often your best imprint is that initial heel impact].
 
Your goal is to locate and mark each step. this "Step by Step" method is the same used by the U.S. Border Patrol and a lot of other agencies that perform tracking. Using your tracking stick, locate each step, even partial prints and mark the heal. In the photo below I have photographed a 10 step section I practiced on:

"10 Step Drill" section of tracks 
 
A good method is to make a "U" behind the heel and make a "wing" on the left or right side to indicate whether a left or right foot. This will help ensure you are locating each step, and also help you know which step you should anticipate finding next. Some people use craft sticks [Popsicle sticks] and poke them into the ground to mark the heel.It may be that you are able to actually see each track, but be diligent and physically locate and mark each track using the tracking stick. It's important to build solid skills by consistent, proper practice:

Right track marked with a "wing"
 
When practicing, you should make a sketch of the track you are following for reference, especially if you are using a heavily-trafficked trail or path. The tracks of other hikers will contaminate the scene and make it harder to discern the track you are seeking. Even if you know the track well, there may similar treads that will confuse you and mislead you. Track report forms for sketching a track can be found online, as can actual tracking notebooks. Another method is using a crayon to make a rubbing:
 
Crayon rubbing; Tracking report form
 
When I practice tracking, I carry a small kit that I have assembled. I carry 2 tracking sticks, 3' and 4' lengths, a tape measure, a 3" piece of plastic ruler, mirrors, tracking reports for sketching prints, pens, pencils, notebook, and camera:

Tracking Kit
 
Often, tracks will appear and disappear on the trail, and a mirror can help tremendously to make contrast and cause an "invisible" print to appear. In the next photo, a backpack is used to shadow a section of debris-littered trail where a track is suspected to have landed. An inexpensive dollar store pocket  mirror is then used to make oblique light and cause details to appear:

 
Mirroring technique
   
Track "washed out" by sunlight
  
Same track, detail from mirroring
 
Some people do "side heading"...getting on all fours and looking at a print sideways with their head low to the earth. I have not had luck with this...maybe it is me, maybe I am doing something wrong, but it may work for you, so I mention it in passing. 
 
Everybody walks differently, so it's a good idea to enlist friends, using a shoe you are not at all familiar with, to lay down a track for you to practice on.

Another point...though I've used the 10-step drill here for demonstration purposes, you don't have to use only 10 steps. You can use 20, or 30, or even a random distance like 30 yards. the point is, pick a distance and use it for your practice sessions. As you become better, you can change it up and go longer if you wish, perhaps an entire trail...as an example: You can also just find some stranger's tracks on a path and use them for practice. Once, I watched a man stop and rest on a trail. After about 20 minutes he left, so I walked over and noted his shoeprint pattern and then "Hasty tracked" [a fast moving way of visually tracking, not the slower step-by step method] him down the trail until I located him. He was a very large man and consequently walked extremely splay-footed, which was distinctive and helpful. More interesting to me was how his tracks vanished and reappeared on various sections of trail, even in medium that I would have sworn would retain a track. One instructor has said, "It's the tracks that you don't see that have the most to teach you." 
 
I've written another post on tracking on this blog, and mentioned some book titles I recommend. Either way, it's important to get outdoors and practice on various mediums. A lot of tracking is training yourself to be "track aware", training your eyes to not just "kook" but to "see"...to alert to and pick out minute detail in the dirt and see what is a disturbance versus that which is natural [Note, while this blog mainly deals with "mantracking" the skills and awareness it builds certainly enhance and develop your nature observation of wildlife tracks and spoor].

As you get better you can try the 10 step drill on more challenging surfaces, such as rocky or harder soil [less track retention], sand [less definition/faster decay of print], debris littered paths, grasses, or leaf litter beds [more focus on disturbance in the litter material than actual print impressions], and across rock [true experts].
 
Happy Tracking!
 
GOBLIN RANGER/WOODS DEVIL

Tuesday, October 14, 2014

Neolithic Morning

This morning I returned to the El Chorro to explore further. I've been reading Tom Brown Jr.'s  book, "Tom Brown's Field Guide: Nature Observation and Tracking", and have been wanting to do practical application of some of the lessons it gives. Today I wanted to find a hide. Brown recommends finding a hiding place and waiting for an opportunity to observe animals.

I started about 8 am, hiking as silently as possible up the Eagle Rock Trail. Going up the trail I watched the ground for tracks and sign of wildlife, oddly enough, noticing what I thought to be a human hand-like impression on one side of the trail. A friend saw the photo and gently corrected me that it was likely a bear and comparing it to a tracking manual, I would agree:

A bear on Eagle Rock Trail?
 
I also observed some scatch marks, probably made by some animal, likely a wild cat or dog:

Scratch marks in the soil
 
Presently I arrived at an area I'd noticed the previous week; some oaks with branches that dipped down to the ground and there were met by the sagebrush and chaparral, creating an effective cover from which to sit and observe and listen to nature. I slipped under the limbs unobserved. 

Once inside the canopy, I climbed up a large branch of the oak and sat silently. The wood was alive with calls of birds and they flew in and out of the tree, apparently in pursuit of one another. These were the only wildlife observed that morning, but it was very tropical, humid at about 68 degrees, and often wildlife will shelter up if the weather hints of rain.

An interesting event occurred while sitting in the tree. A *hiker* came up the trail and stood about 30' or so from me. Apparently he thought himself alone, for he engaged in several coarse behaviors and then moved off. I'll say it again: BE AWARE of your environment! 

After a while I decided to move on and explore the area further on foot. I'd found Indian grinding holes on a volcanic boulder pile on my previous visit [photo below] and decided to look for more.

Acorn grinding site
 
I stood in the grey overcast morning light and surveyed the valley. I could visualize the aboriginal peoples gathering acorns, grinding them and talking, the children running about playing, and the men stringing their bows and preparing for a hunt. Nearby, I found more grinding holes on some smaller rock plates. I found a Hawk's feather and placed it on this stone, to show my respect for these ancient peoples who undoubtedly saw this land and held it as a sacred gift that provided the necessities of life.

 Ancient Altar of Stone
 
As I walked up the side of the canyon I saw two trees that had been misshapen by years of winds blowing against them. They were so stark against the dark grey sky, and yet they have persevered over time. 

Windswept trees on the ridge line
 
An important aspect to nature observation is to let go of time...the feeling that you need to be somewhere at a certain time. Brown suggests that you, "...let the terrain and your interests dictate your schedule." I don't recall looking at my watch, but rather, just immersed myself in the natural beauty around me and concentrated only on stalking quietly, listening, and observing.
 
On the way out I went ahead and did a litter sweep. Show respect for The Gift and leave it better than you found it if you can:
 
I collected a fair amount of litter
 
In closing, I would highly recommend "Tom Brown's Field Guide: Nature Observation and Tracking" to anyone wishing to become more skillful at woods stalking and tracking. His courses are very expensive, but the book contains many useful lessons that can be practiced by a dedicated individual.


Safe Hiking Outings!

Goblin Ranger


BUSHCRAFT WOODS DEVIL/FACEBOOK
BUSHCRAFTWOODSDEVIL/GOOGLE +
BUSHCRAFTWOODSDEVIL/YOUTUBE