Friday, October 11, 2013

Cerro Cabrillo tracking outing

Today I decided to go for a wildlife tracking outing at Cerro Cabrillo  [Cabrillo Peak:  35°21′08″N 120°48′54″W]20.8148997 , a day use unit that belongs to Morro Bay State Park [CA] just a mile or so from my home.

Cabrillo Peak is a volcanic plug and part of a chain of volcanic peaks here that are known collectively as "The Morro's" and also as "The Seven Sisters" to natives and longtime locals [They're sometime incorrectly called "The Nine Sisters" by people who want to count an offshore sea mount that has not conclusively been proven to belong to the system].

 
A view of The Morro's from atop Portola Trail


There are several trail heads around the perimeter of the property, but the day use area can most easily be accessed from the Quarry parking lot on South Bay Boulevard, about a half mile south of Morro Bay State Park Road. There is a parking lot with room for, I don't know, maybe a dozen cars or so. It's also infrequently patrolled by Rangers and hidden from road view, so be sure to lock up your valuables out of sight.

The Cerro Cabrillo day use trails are sun-exposed and there is no water, so make sure you take extra water and some trail necessities like a small First Aid kit, tissues, etc.
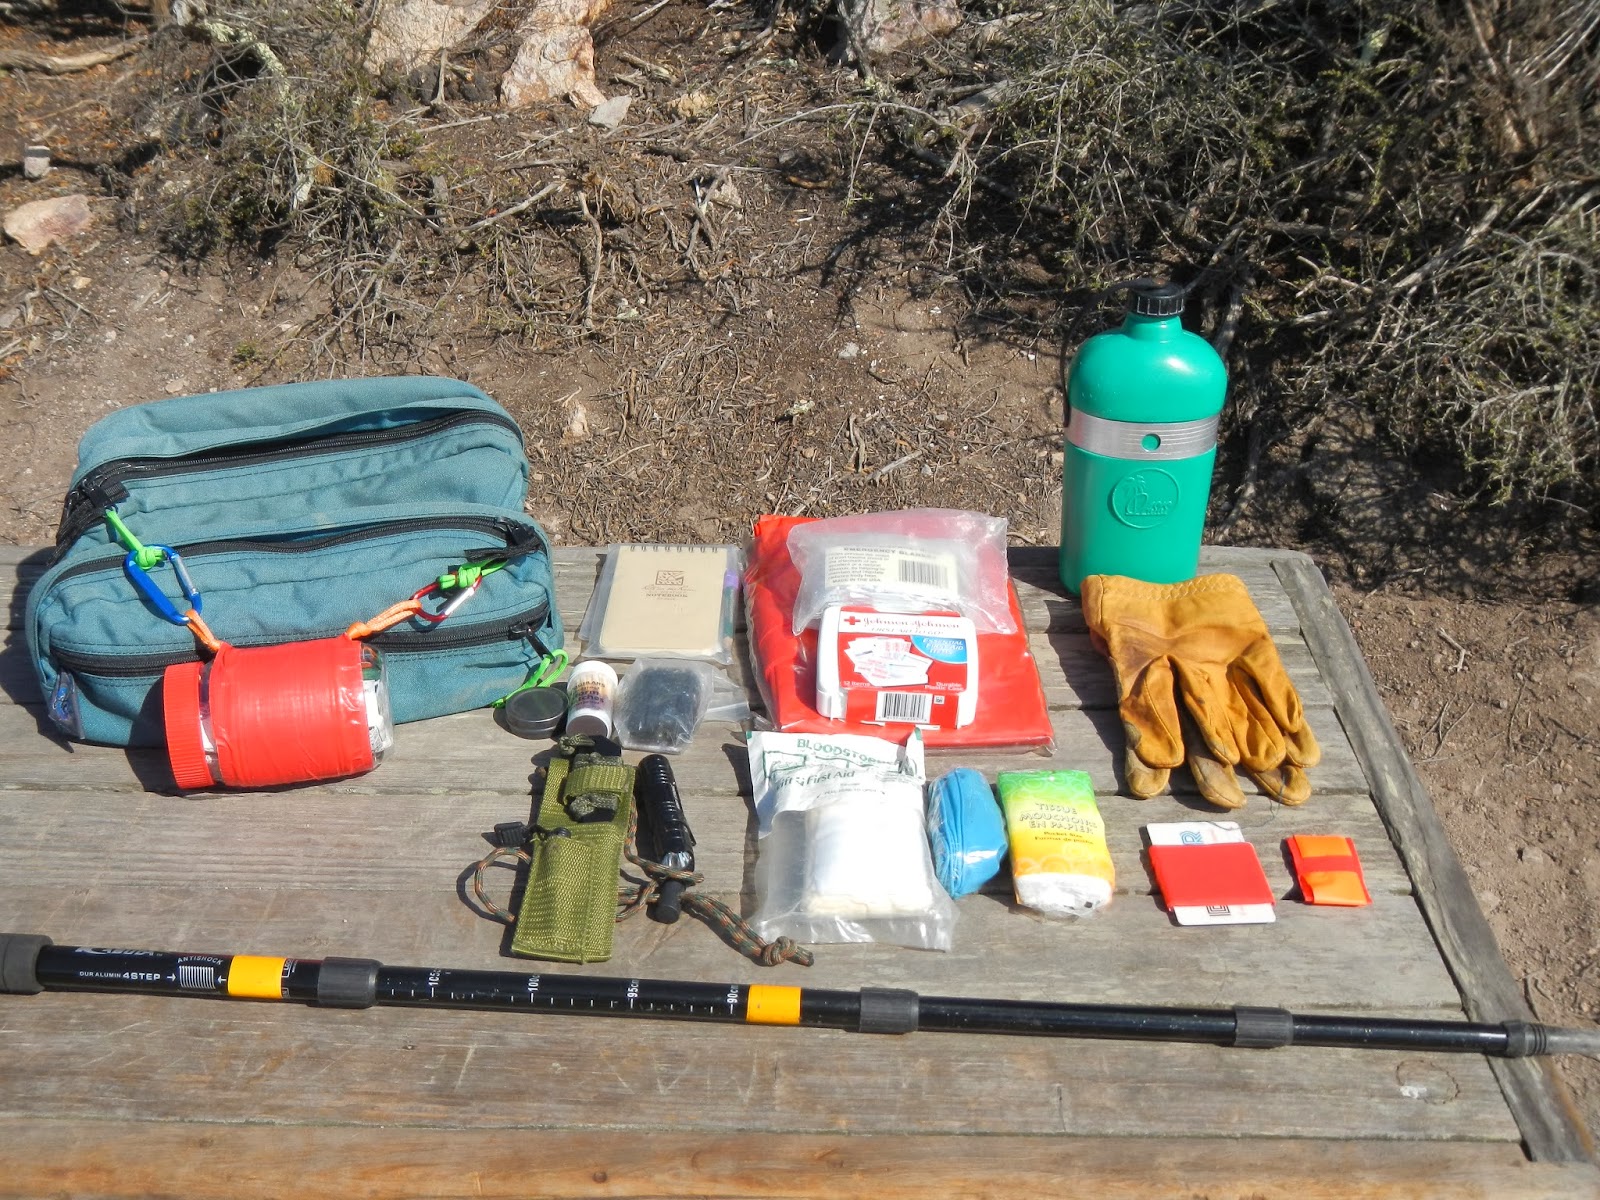

Fanny pack trail kit with water bottle &  First Aid kit

I started the hike at around 12 Noon, and there had already been many mountain bikers and hikers on the trail. This obliterates a good deal of the wildlife tracks made the night before and early that morning. It would be necessary to watch the cover along both sides of the trail and game trails leading away from the trail if I hoped to see any tracks. This is usually not a problem though, as most animals tend to hug the protection of the vegetation and chaparral closely in case they need to suddenly run and evade a predator.

Not far up the Quarry Trail I spotted a recently made oval-shaped dog track on a narrow game trail leading into the brush. Outside the opening there were none of these tracks, as would be expected of a hiker with a domesticated dog, so its possible this track was left by a Coyote hunting the cover:


Canine track, possible Coyote 


Just a short distance beyond I came across a pile of scat on top of a rock in the center of the trail. It was full of berries. It's hard to say what made this...could be a Raccoon. Basically, scat is made up of whatever the animal didn't digest. There's also purpose in placement; it's kind of a way for an animal to communicate it's territory to competitors. There was a game trail on one side, and that's common on these "boundary marker" scats:

 
Berries in scat

Be sure not to handle scat. It can be full of harmful parasites. If you must break one open to study contents, wear protective latex disposable gloves, use sticks to break up the material, and keep away from face and exposed skin.

Just a short distance beyond the scat pile I located a batch of tracks from a raccoon, which kind of supports this scat was made by one. In the photo below, the print from a front paw of a Raccoon is visible. they have long fingers on the front paw, which resembles a human hand. The rear paw is elongated and more closely resembles a human foot, however there were none that were photographic quality, so only the front paw is shown here: 


Front paw impression from a Raccoon

Another very common form of scat are pellets left by Jackrabbits and Cottontail rabbit's. These you will notice under the brush cover along the sides of trails, as this is where these animals tend to feed. They also stick to the cover for protection from predators like Bobcats.   


Rabbit pellet droppings
 
Another very common animal whose tracks are seen hereabouts in profusion are Black-Tail Deer. In the photo below, you can see deer tracks walking on top of tracks left the day before by hikers and bikers. These fresh tracks appear somewhat reflective of the sunlight. Trackers refer to this condition as "shine".

 
Deer track "shine"

 
Some animals [Bobcats, Mountain Lions, Foxes] have "direct register" tracks...in other words, when they move forward, the rear paw lands directly inside the print made by the front paw. Deer are "indirect register" animals, meaning their rear hoof will be close to, but not precisely inside, where there front hoof was placed: 

 
Deer hooves - indirect register

Sometimes you can spot an animal's den. In this photo, we see a den belonging to a Dusky-Footed Woods rat, a rodent common to this area:
 
 
Dusky-Footed Woods Rat den

Male Woods Rats build their dens in trees, thus, this is a female Woods Rat's den. The Woods Rat den as 4 chambers or rooms, which they line with leaves that are toxic to fleas.

The aboriginal peoples used to hunt Woods Rats using a long notched stick. They would push the stick into the den, probe to locate the rat, twist the notched end of the stick into the rat's fur, and then withdraw it from the den. The rat was cooked pretty much intact until it was charred and then they'd pulverize it using a stone mano [hammer stone or pestle] and a metate [a flat grinding stone] and consume bones and all!  

As I'd mentioned in my October 10, 2013 post, "Track Awareness", I am by no means an expert tracker, But I learn something new every time I get out on a trail and look for tracks and sign. Locating tracks requires that you develop knowledge of where animals move, how they use cover, and mark their territories, and this can only be learned through study and hands-on "dirt time".  

Happy tracking!


© 2013, MANNY SILVA, ALL RIGHTS RESERVED

Thursday, October 10, 2013

Track Awareness

In my post October 1, 2013 post, "Woods Stalking and Nature Observation", I touched briefly on wildlife tracking and suggested training yourself to become "track aware". I want to touch on this in a little more detail and give you a few tips to build skills that will help you to become an amateur tracker and enhance your outdoor adventures.

I will tell you, I am a hobbyist and by no means am I an expert. I have a very few rules I adhere to that work for me, but they allow me to enjoy my woods outings all the more by being track aware.

At it's heart, tracking is an ancient skill and art practiced by throughout the history of mankind. We humans got to the top of the food chain by cunning and intellect...and our ability to track and understand animal behaviors and sign. Many people's around the world like the Bushmen of the Kalahari still survive, hunting food animals through the use of this skill. Military, Police, and Search & Rescue organizations still rely on tracking in their operations.

A good first step toward becoming a tracker is to purchase or borrow a book on North American mammal tracks and then familiarize yourself with animal tracks and their characteristics.

There are some excellent guidebooks, however many can be quite pricey. Sometimes you can find inexpensive animal track pamphlets at your local state or federal parks. One booklet that I have used and recommend is "ANIMAL TRACKS [and using the track tracer] by Barry Breckling. I bought it many years ago but [I think] it may still be available from the Pine Ridge Association [ www.coepark.net/pineridgeassociation]. It has diagrams of common animal tracks, gait information, and also has a handy ruler scale on the rear cover.  

Another excellent book I own and enjoy is TRACKING AND READING SIGN by Len McDougall. This is a large hardcover book filled with photographs and information on how to track. He's also a member of the International Society of Professional Trackers [www.ispt.org], an organization that studies and promotes tracking skills.

Besides a reference guide, some tools to carry with you when tracking are a tape measure or pocket ruler, some sketching paper and a pencil, A digital camera is nice to retain images of tracks you find, but not necessary.

Learning to track requires that you put in "dirt time"... you have to get outdoors and get on a trail and start looking in the dirt. Most animals are active at dawn and dusk, and I find that the best results come from getting out early before people and vehicles start obliterating tracks from the night before.  Again, be knowledgeable of what animals live in your area and study their tracks in advance. You'll pick it up faster with some knowledge going in. 

"Track traps"...these are any area that can capture and retain a print for later evaluation. Check the dirt shoulders of roads and trails...predator animals tend to hunt along cover and prey animals hug cover for protection. Look under brush at the shoulders of roads and trails and you will likely see prints.  Muddy edges of puddles and ponds and streams are really good for retaining prints in the wet soil.

Study and learn to recognize the other signs and behaviors of animals: scat left on the trail, territorial rubbings and scrapings, game trails and bedding areas...all tell a story of an animal's passing through the area.

The most common track you'll encounter is that of humans. You'll become acutely aware of fresh shoe prints and disturbances that will convey the presence or passing of another person in the vicinity. With time and practice, you'll be come somewhat adept at aging tracks and knowing how recently the person was here, whether they were running or walking [pressure release/exaggerated toe dig], or even if they were tired or wearing a pack [dragging toe and or heel]. It's really gratifying when you follow a set of tracks and come upon the person wearing those shoes and realize it is who you have been tracking.

So those are my suggestions. Now get out on the trail, start looking and learning, and be TRACK AWARE!

 
Raccoon tracks on a muddy roadside. Raccoon tracks look like little
human hands, especially the front paws. Back ones are longer.


Possible Mountain Lion track, Montana de Oro State Park, CA


Same track with a Quarter for scale.


Deer track. Probably from a calf born this past season. 


© 2013, MANNY SILVA, ALL RIGHTS RESERVED


Monday, October 7, 2013

Paperclip cup stove...cheap and efficient!

While hiking today I decided to build a small twig fire and brew a cup of hot coffee. I used my folding E-tool to clear away dry grass and leaves and to scrape a small key-hole fire pit, which I banked and lined with rocks. I then cut some green wood stakes, sharpened the ends, and drove them into the ground to make a stand for my cup:


As I worked on the fire pit, I became aware of wind gusts and, noting the dry conditions, decided against having an open fire for safety. However, I always carry some ESBIT tablets and a steel paperclip cup from the Dollar Store in my trail kit for a field-expedient cook stove.

Two or three ESBIT tablets nest nicely inside the paperclip cup. The paperclip cup is perforated and draws air well, allowing a hot burn. I used to use ESBIT stoves but got tired of them collapsing and spilling water everywhere and extinguishing my fuel. In the photo below, you can see the paperclip cup stove brewing my coffee:


One ESBIT tablet will make a hot cup of water or coffee, but I do not recall ever having achieved a "rolling boil" with just one tablet. Surplus U.S. Military Trioxane tablets work excellent, but are hard to find, as they are no longer made [MRE's have a self-contained meal heater packet]. I have had poor results using the current military gel fuel packs, and STERNO is a waste of time and money in my opinion. 

Always be aware that even the green wood pegs will dry out and burn during the process. Be watchful and attentive to your fire and keep water and a shovel or E-tool handy for safety. The wind was blowing the flame, robbing some heat, and you can see two of the pegs became charred:


After enjoying my coffee I poured water on the charred pegs and then coated them with thick, wet mud to ensure they were completely extinguished.  A paperclip cup stove works well and only costs a dollar, versus the $7 to $10 dollar ESBIT stove. If I forget or lose it, it is no loss.
 
 
One other thought: a quick and easy alternative to fashioning wooden pegs is to go to your hardware store and buy some 3/8 in. x 10 in. galvanized-steel spike nails. the flat heads work well for a cup or pot stand and they will not burn. Also, you can double-duty them as tent or tarp shelter stakes or for a spear point, digging tool, etc., although they'll add a fair amount of weight to your pack. 


© 2013, MANNY SILVA, ALL RIGHTS RESERVED
 

Sunday, October 6, 2013

Woodsman's Zip Loc bag

A lot of outdoor instructors suggest carrying a 1 quart zip loc bag for water collection in an emergency. But if you don't have one, here's a neat trick that can use any plastic bag strong enought to hold water...a "Woodsman's Zip Loc Bag". It's a field-expedient means of collecting/carrying water if you lack a canteen or don't wish to cross-contaminate your canteen with water that has not yet been disinfected.

This is also an example of how you really can self-instruct using books and video's...in this case, I learned the method from one of the excellent BUSHCRAFTMYWAY Youtube channel video's that I have watched online [I'll attach the link below].

All you need for this project is a plastic bag, a piece of green wood, and some cordage:


I like to use the liners from cereal boxes because they are a very tough plastic [and free]. I carry a couple in my day pack for emergency water collecting purposes. Using a knife, carefully split a piece of green wood:


Fill the bag with water. Extra air is bled from bag and one piece of the split wood is rolled into the spare plastic. The second piece is applied to prevent unraveling of the bag. A piece of paracord serves to lock the 2 pieces of wood together and to act as a handle for carrying.

Here you can see the completed bag and how it works. The bag is filled with water [2 measured quarts]:


Here is a close-up of the cordage and lock assembly. This system works well and if the bag is tough enough material, can even be lashed to your pack to transport water:


And, to give credit where credit is due, here is the excellent BUSHCRAFTMYWAY video with instructions on this technique:

 http://www.youtube.com/watch?v=naZoj2f6Pdg


© 2013, MANNY SILVA, ALL RIGHTS RESERVED


Tuesday, October 1, 2013

Woods stalking and nature observation

When I first started spending time on trail, my outings were built around gear and fitness. I've always been a bit of a "gear geek", and so I'd always tend to "over pack" for my day hikes and outings. I have gotten better, but sometimes I still take quite a bit of trail kit with me, especially on my longer outings. I also focused my early outings on fitness...carrying a pack load and covering a lot of ground quickly.

Over time, my interest in wildlife and useful plants began to grow. I began taking photographs of plants and animals that interested me, and tracks and signs left by animals.


Mountain Lion track - El Chorro Regional Park

As I became more comfortable in the woods and on trails and develop bush craft skills, I began to shed a lot of the gear I'd previously carried, choosing instead to take a minimalist approach. I've developed some personal practices that work well for me for nature observation when hiking, and I am going to share them in this article. My wish is that you will find them useful and that they will enhance your outdoors experiences.

My first suggestion is that you choose trail clothing that is soft, quiet, and protective. Stiff canvas clothing can be very noisy when moving through thick brush. Fleece hunting clothes are often designed for quiet movement and are ideal for nature observation as well. Military uniforms are also designed to be quiet and are camouflaged and can be bought used for little money.

You should wear gloves so that if you drop something and react without thinking, you will be  less apt to run your hand onto stinging nettle or into Poison Oak or Sumac, and will protect your hands if you need to move a branch away from you. Keep your arms in close with your center line so you can move more easily through brush and narrow trails and avoid contact with these plants.

Shoes should be flexible, light, and soft rubber soled. Moccasins are okay for stalking but can be slippery to walk in. Soft soles moc's allow you to feel dry branches under foot before applying weight and snapping them.

Keep your trail gear items at a minimum, and store them in a pack. If you must bring them, wrap metal objects with duct tape or cloth to quiet them Store keys in a pocket so they do not rattle.

Develop your personal awareness of the environment around you by learning to use all of your senses. Some people like to walk in the Indian stalking  fashion, and that is fine, but I don't know that it is absolutely necessary unless moving through dry leaf litter or some other noisy medium. What you do need to do is to move slowly with your head up, taking in all of your surroundings. Keep your vision unfocused so that you'll pick up subtle movements faster within your field of view. Consider that you are moving in a sphere and be aware of all around, above and below you.


 Dusky-Footed Woods Rat nest.  The males make their nests
In the tree, while the females build theirs on the ground.

Strive to move in rhythm with the natural surroundings. If you move with a measured, peaceful pace, wildlife such as birds will be more apt to allow you to come closer. If an animal steps onto the trail in front of you, you'll be better able to stop quickly and silently to observe them. Many animals only see in a gray hue and rely on smell, sound, and visual movement to cue them to an intruder's presence.

Only walk as fast as you can safely walk with your head up and absorbing everything. Be aware of material on the trail or trip hazards to avoid. The goal is to develop awareness of everything and to become adept at moving as closely to complete silence as you can.

Be track aware. Tracks [and scat] left by animals tell a story of what animals are using the trail. With time and practice, animal tracks can be discerned from amongst a patch of hiking boot prints. Over time you will develop awareness of even the smallest tracks of insects.

 
Beetle Track in soft sand

Process the smells of the environment as you walk. Is the air dry or damp [water source nearby or rain coming]?  Putrefaction odor would indicate a dead animal or possibly the meat-hide of a Mountain Lion [a safety issue]. Be aware of human smells [colognes, cigarette smoke, food cooking] which would indicate another person in close proximity. Odors that don't belong also tell a story.


Deceased Dusky-Footed Woods Rat found lying beside trail.
 
Sound awareness; Often in brush or heavy cover you may hear some animal's activity before you actually see it. Be aware of bird calls and alarms, or lack thereof when the woods fall completely silent. When you hear these cues you should train yourself to stop and assess what is the cause of the alarm.  If you inadvertently make a noise and generate an alarm, stop and assess what calls and activity your error has triggered. Be watchful for it may flush a wildcat or other animal from a bedding or hide where it was just napping.

As you move, pause to check your back trail often. At least every 100 meters look behind you.Sometimes you will see wildlife emerge from brush once they judge you have safely passed out of range. It also allows you to be aware if you are being followed by a predator [2 or 4 legged] which usually attack prey from behind.

I also find it useful to find a observation spot on a hillside and rest my back against a tree to watch and listen to the wildlife activity. I have had wildlife walk past me, unawares that I was seated there. I often hear alarm calls and within a moment or so a trail runner that was cause for the alarm calls will come running along the trail below me.

In heavy cover and narrow  trail, trekking poles can be noisy and can catch on brush, thus telegraphing your approach. I prefer a single pole of natural wood, as it is quieter. Be aware of the heavy pole striking ground and making vibration, another way of telegraphing your approach. I prefer to carry my hiking pole lance-like at a low ready position or at trail when not in actual use. A hiking stick is also very useful to recover dropped items by drawing them back to you instead of reaching into brush and becoming snake bit or stung.

Follow the LEAVE NO TRACE philosophy and be litter aware. Recover your own litter and collect litter left by others when you can. Collecting litter is useful for training the eye to see what is not natural and that which does not belong in the environment. It enhances observation skills. Consider carrying a trowel in your kit to use for burying your own scat and that of others. Garden trowels can be had for as little as .99 cents at HOME DEPOT and DOLLAR TREE and are useful for making a safe camp fire pit as well.

In closing, I hope these tips will help enhance your time spent on the trail. If nothing else, I would strongly urge readers of this post to get outdoors more often and spend time enjoying nature and observing wildlife. Excursions need not be long or arduous. Even brief exposure to the out-of-doors will enhance your health, both mentally and physically. And you'll be able to help give something back by collecting and removing litter items you find along the trail, many of which are injurious or toxic to foraging wildlife. Best of all, if you have children or grandchildren, you can be a positive influence and enhance their life experience by taking them outdoors and opening their eyes to the beauty of nature.


© 2013, MANNY SILVA, ALL RIGHTS RESERVED

Monday, September 30, 2013

Building your own Personal Survival Kit [PSK]


A Personal Survival Kit [PSK] is a good idea for anyone who spends any amount of time camping or hiking in the woods. It should be compact and the intent is that it be worn on your person or carried in a pocket at all times. In that way, if you become separated from your pack, you then have a means of  making a fire, signalling help, or dealing with an injury.
 
The key to a PSK is to make a habit of carrying it so it becomes ingrained practice. Use it often and strive to add to it and continually seek to improve the contents of your kit.
 
In this photo below, we see an example pocket-carry PSK that has been assembled using an ALTOIDS mint tin:
 
TOP to BOTTOM - LEFT COLUMN: Band-Aids, Pencil & Ground Signal Sheet, Signal Mirror, Fresnel Lens; CENTER COLUMN: ALTOIDS tin [signalling, water collection], matches/striker, sewing kit, fishing kit, burning lens, compass; RIGHT COLUMN: Jute cordage, snare wire, lanyard with whistle, lock back knife, B.S.A. Mini-hot spark.


In the next photo below, we  see a larger belt-carry pouch PSK. The pouch was made out of scrap leather and a button made from an old coin.This kit has been expanded to include some extra kit items to give a little more margin of safety, including a poncho that could be used to build a shelter in the event of unexpected wet weather: 

CLOCKWISE FROM LEFT - Leather belt pouch; Cereal box liner [useful for water gathering]; Emergency poncho with a hand warmer; Signal Mirror; Tin of Vaseline cotton, jute tinder cordage, storm matches; self-made pouch for mag bar and striker [bottom]. CENTER: ALTOIDS tin kit as shown above.


Again, the key is to carry it always and build a solid habit of having the kit with you, so it will be there when you need it.

I would also recommend the book "BUILD THE PERFECT SURVIVAL KIT" by John McCann [USMC]. It is full of photo's, tips, and information on assembling this, and other types of survival kits. His business SURVIVAL RESOURCES [
survivalresources.com] sells the book and items useful in building a PSK. I have attended courses taught by him and can personally vouch for his excellent knowledge and competence in survival-related matters.


© 2013, MANNY SILVA, ALL RIGHTS RESERVED